Fun Summer Activity for Kids – Rock Painting

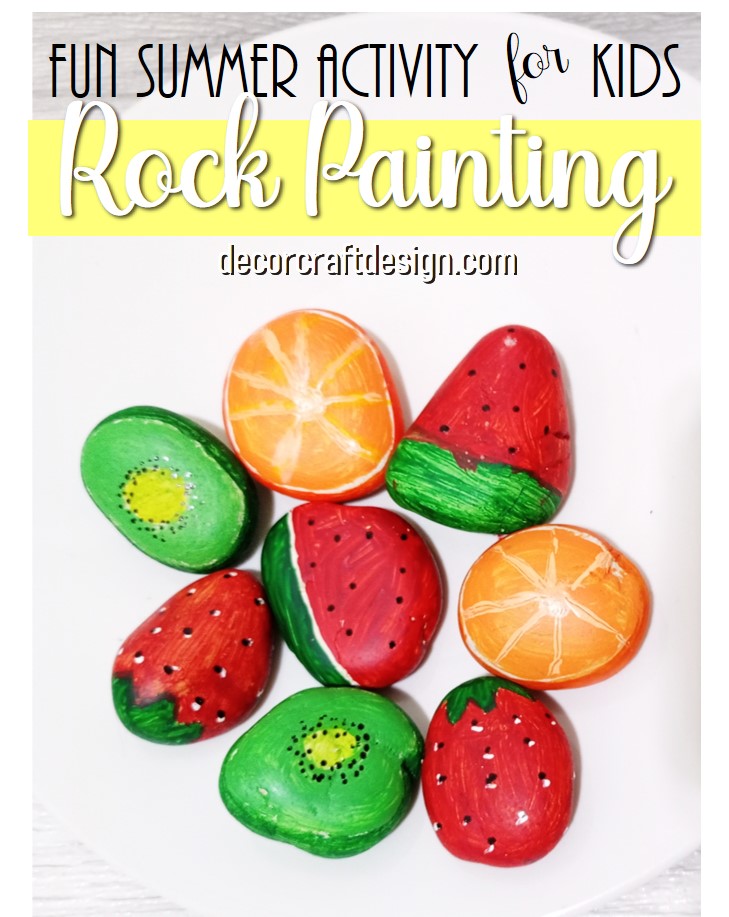
My kid kept asking me to paint some rocks together. Finally, I have the rocks to do it. We were looking for a theme for the rock painting until my kid agree to make some fruits out of rock painting. It’s summer and fruits do looks very yummy on hot days. So we made different kind of fruits and if you look carefully, you will know which ones are my kid’s and which ones are mine.

Rock painting fruits is easy to do but it’s surely need some patience because it has to be done in phases and waiting for the paint to dry. So I guess, this rock painting activity does teaches kids to be patience, be detail and careful, aside to learn about painting works and color selection. Rock painting for colorful fruits is just one of perfect summer activities for kids. Let see how!

Things To Prepare

I intentionally bought white rocks for this fruit rock painting project. So if you like collecting rocks, then this is one of the great way to upgrade your rock collection. Let’s see what are the complete super short list supplies that are used to make this Fun Summer Activity For Kids – Rock Painting :

  • White rocks (choose wide, flat and smooth-surface rocks. If you have black or other color rocks, paint it in white first as the base color.)
  • Acrylic paint (red, white, green, yellow)
  • Tooth picks and paint brush
  • Black marker

How To Make

Rock painting looks pretty simple and easy, but it takes some patience and tricks to do it in a faster way. Follow these easy steps on how to have Fun Summer Activity For Kids by doing Fruits Rock Painting :

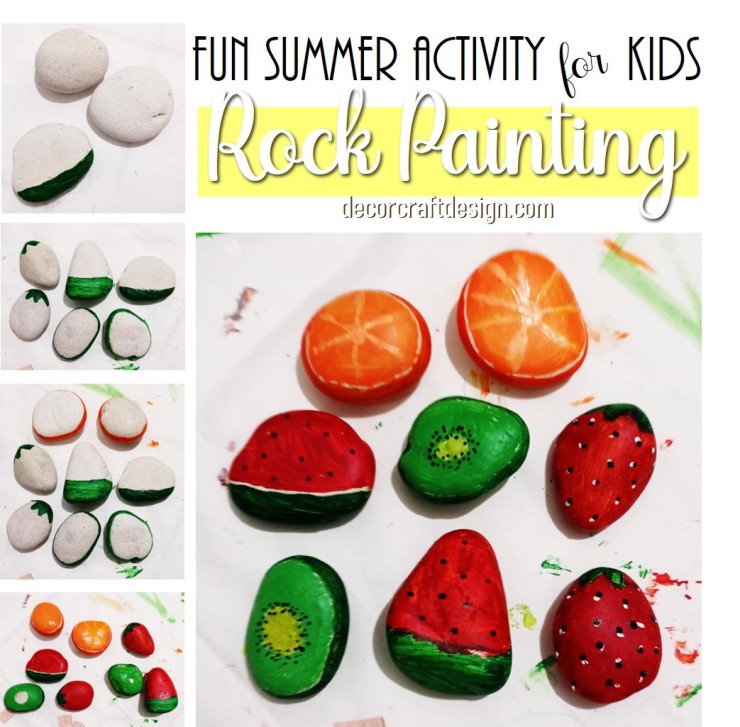
1 . Make sure your rocks are cleaned. If your rocks are not white rocks, paint it into white first. Mine are white rocks. Decide what fruits do you want to make.

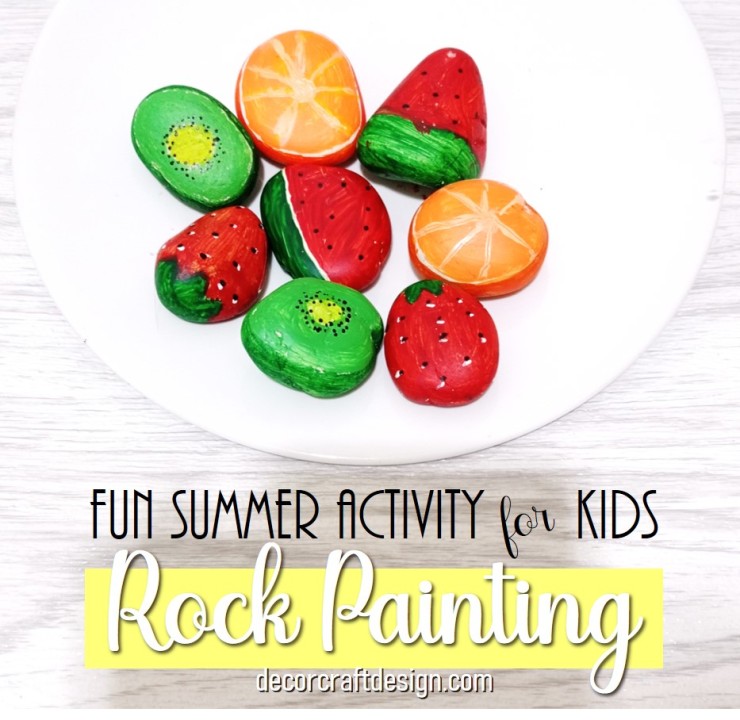
2. Me and my kid made kiwis, oranges, strawberries, and watermelons. What you have to do is to choose the shape of the rock that resembles the shape of each fruit that you’re going to paint. Like for example, try to find round shape rock for an orange, a triangle shape rock for a piece of watermelon and so on.

3 .Prepare your paint and a big bowl of clean water. The water is to wash the color away from the brush every time you need to change color. I also use large paper to protect my floor from the paint, it’s going to be a bit messy.

4. I started with green paint. I paint the strawberry leaves on one side of the rock; continued with watermelon’s skin, also on one side of the rock; and last with the kiwi’s skin. Ask your kid to go along or copy the way you paint it. By the time I finished with the kiwi, the strawberry would already dried, then you can do the same again by painting the strawberry’s leaves on the other side and so on.

5. We went back to strawberry rock again. After cleaning our brush, we use red paint and paint the strawberry and continued with watermelon. Then wait for a while and do the same on the other side of the strawberry and watermelon rocks.

6. Move on to the kiwis, have the paint in lighter green (mix green with white to get lighter green). paint the inner kiwi and leave a little circle for some yellowish green in the middle. let it dry.

7. It’s time for the oranges! Get orange paint (can mix red and yellow to get orange color) and start to paint the outer rock. Continued with lighter orange color for the inner orange. Let it dry.

8. Now we go back to the strawberries! Get a toothpick and use it to give a white paint dots all over the strawberry rock. Let it dry.

9. Get a black marker and start to give dots on the watermelon rock; it will look like watermelon seeds. Followed by strawberry, make the dots next to the white dots. And you are finish with the strawberry and watermelon.

10. It’s turn for the kiwi, give the black dots around the inner circle. And kiwi is finish!

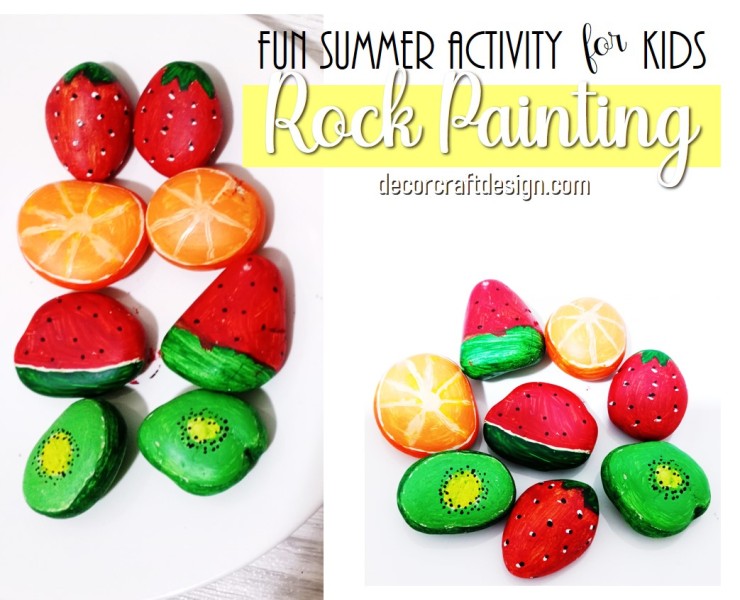
11. And last is the orange, apply white paint or you can use white marker to make the orange pith. I use toothpick, but I think you can have a better result with white marker. Orange is finish too! Yay!

Rock painting is just a great kid’s activity to do together on Summer holiday. Your kids can learn to be patience and play with color mixing and and have fun painting. With good result, your rock painting of fruits can be presented as a plater of fruit rock decoration. Cute vibrant colors of the fruits will look perfect for Summer.

For more of my futureSummerposts, please follow me! And if you wanted to add my creations to your Pinterest boards, please follow me on Pinterest! Also find me on Instagram and Twitter!

For creative fellow bloggers, don’t forget to join You’re The Star” Blog Hop, Happiness Is Homemade Link Party and Home Matters Linky! Link your inspiring posts (anything, from recipes, home decor, DIYs, crafts, family, health to gardening) every Monday and Sunday. Get a change to be featured! I’m one of the co-host of You’re The Star blog hop for Creative Week and Happiness Is Homemade; I will choose the creative posts to be featured on Creative Features week and on Happiness Is Homemade. Please come and join the blog hop and I would love to see you there! Please join and share the news!

Easy DIY Pumpkin Cardboard

Fall and Halloween are identical with pumpkins. If you want a fake pumpkin but tired of plastic pumpkins, this super easy diy pumpkin from cardboard could be a great idea! You can use it along the Fall season, from welcoming the Fall, fun with Halloween and celebrating thanksgiving. And it’s a very cheap Halloween DIY or Fall DIY or Thanksgiving DIY, whatever you wanted to call it.

Picture97

Things To Prepare

Very easy DIY pumpkin project, only takes you just about cardboard to make it. Here are exactly what you need to have:

  • Cardboard
  • Flannel (color: green)
  • Orange pumpkin watercolor
  • Glue

Picture95

How To Make

Super easy to make and you don’t have to be too detail, so it’s a quick diy to do. Let me share you how the steps are:

  1. Draw circle on the cardboard, make a set of two for each diameter. But start with middle circle which only took one circle; I made it in around 3 inches (8 cm). Make a quarter  of an inch smaller diameter from one circle to another fir the next circles. So, make 1 middle circle (3 inches), 7 sets of circles with a quarter inch smaller each circle, and 3 circles to continue the 9th circle for the pumpkin’s top; with still a quarter inch smaller for each circle.
  2. Glue and stack up the circles of cardboard of each diameter. Leave it dry.
  3. Cut around 3/4 inch of 20 circles on cardboard to make the pumpkin stem. Stack the circles and glue each of it and let it dry.
  4. Glue the cardboard steam to the cardboard pumpkin and let it dry.
  5. Paint the cardboard pumpkin with orange pumpkin and some brown watercolor to the stem.
  6. At last, tie a green flannel to the pumpkin stem. Finished!

Picture98

This cardboard pumpkin was my other cardboard project that I did, I made a maple tree from cardboard and Fall letters cardboard. Easy and cheap seasonal diy for your Fall and Halloween decor inspiration. A rustic rustic look of the cardboard pumpkin is just a great upcycling project. You can be creative with the colors and decorations of the pumpkin. Be creative and happy trying!

For more of my future Fall and Welcoming Halloween posts, please follow me! And if you wanted to add my creations to your Pinterest boards, please follow me on Pinterest! Also find me on Instagram and Twitter!

Picture96

Pinterest-iconImage result for instagram buttonRelated image

And for creative fellow bloggers, don’t forget to join “You’re The Star” Blog Hop ! Link your inspiring posts every Monday and get a change to be featured! Starting June 2019, I will be co-hosting the blog hop and would love to see you there! Join and share the news!


See you!

Pump your creativity!

Mel

DIY Fall White Maple Tree

Couple of days ago I made a fall maple tree out of a cardboard. I painted it with fall colors of a real maple tree. Then I thought to my self, why don’t I paint the other side of the cardboard maple tree with clean white. A different look from real fall colors maple tree to modern minimalist maple tree. I added the word fall to give a contrast, white against black. So this maple tree become two sided decoration with two different style to match your fall theme.

Picture86

Things To Prepared

Things to prepared for making this upcycle diy fall maple tree are:

  • Cardboard
  • White spray paint
  • Black marker
  • Glue

How To Make

Easy steps to turn cardboard into a pretty fall maple tree decoration are:

  1. Draw different shapes of the maple tree on cardboard and then cut it. Make 7 sheets, less or more sheets depend on the thickness of the cardboard you have. Make it thick enough to be able to stand.
  2. Glue all sheets together to form a fall maple tree that able to stand. Let it dry.
  3. Since, I made this maple tree before, so I just use the other side of the glued cardboard maple tree for this project.
  4. Paint the cardboard maple tree with white spray paint. Let it dry.
  5. Draw the word Fall with black maker. Let it dry.
  6. Your diy fall maple tree is finished!

Picture84

Very easy and cost you almost nothing to make this fall diy. And the good thing is you can have two styles of maple tree, so you could have two different style for your fall decor. It would look fabulous if you combine it with the rest of your modern minimalist or rustic farmhouse fall decoration collection. A fall maple tree from cardboard, great upcycle fall diy project for your spare time.

For more of my future Welcoming Fall season posts, please follow me! And if you wanted to add my creations to your Pinterest boards, please follow me on Pinterest! Also find me on Instagram and Twitter!

Picture85

Pinterest-iconImage result for instagram buttonRelated image

Join The Coffee Blog Tour and Win Coffee Themed Giveaway!!! And for creative fellow bloggers, don’t forget to join “You’re The Star” Blog Hop ! Link your inspiring posts every Monday and get a change to be featured! Starting June 2019, I will be co-hosting the blog hop and would love to see you there! Join and share the news!

See you!

Fall for creativity!

Mel

DIY Fall Maple Tree From Cardboard

I’ve found so many cardboard on my storage. I had to do something with it instead of just throw it on the garbage. So first thing I think of was making a fall diy of maple tree from those cardboard.

Maple tree is a beautiful tree; it has a distinguish shape of maple leaf and amazing colors that changing over the seasons. I tried to capture those beautiful colors of maple tree during fall season. And I made an abstract shape of the tree.

Picture82

Things To Prepared

Things to prepared for making this upcycle diy fall maple tree are:

  • Cardboard
  • Watercolors (red, yellow, orange, green, brown) – fall colors
  • Poster color in white
  • Glue


How To Make

Easy steps to turn cardboard into a pretty fall maple tree decoration are:

  1. Draw different shapes of the maple tree on cardboard and then cut it. Make 7 sheets, less or more sheets depend on the thickness of the cardboard you have. Make it thick enough to be able to stand.
  2. Paint each cardboard sheet with white poster color. Let it dry.
  3. Mixed colors of Fall and paint it on each sheet with different composition. Let it dry.
  4. Glue all sheets together to form a fall maple tree that able to stand. Let it dry.
  5. Your diy fall maple tree is finished!

Picture81

Very easy and cost you almost nothing to make this fall diy. It would look fabulous if you combine it with the rest of your fall decoration collection. A fall maple tree from cardboard, perfect upcycle fall diy project for your spare time.

For more of my future Welcoming Fall season posts, please follow me! And if you wanted to add my creations to your Pinterest boards, please follow me on Pinterest! Also find me on Instagram and Twitter!

Picture83

Pinterest-iconImage result for instagram buttonRelated image

And for creative fellow bloggers, don’t forget to join “You’re The Star” Blog Hop ! Link your inspiring posts every Monday and get a change to be featured! Starting June 2019, I will be co-hosting the blog hop and would love to see you there! Join and share the news!

See you!

Fall for creativity!

Mel

How To Make Nautical Ornaments By Using Only Cotton Rope And Popsicle Sticks

At first, I was only making one Nautical ornament from only cotton rope and popsicle sticks; which is ship wheel for my upcoming coastal theme project. But then, I ended up making more Nautical ornaments; an anchor and a life buoy. Do you want to know how to make the three Nautical ornaments from only two materials; cotton rope and popsicle sticks? Well, let’s begin!

Things to prepare on how to do Nautical ornaments :

  • Cotton rope
  • Popsicle sticks
  • Glue
  • White acrylic paint
  • Blue acrylic paint

Picture101

Steps for making the ship wheel, anchor and life buoy from cotton rope and popsicle sticks are so simple :

  1. Ship wheel : glue cotton rope to shape a full circle. Paint four ice sticks with white acrylic. Glue the four sticks like in the picture. Glue the cotton rope to the ice cream sticks and make the outer circle. Finished!
  2. Anchor : Paint two ice sticks with white. Cut and glue ice sticks like in the picture. Use cotton rope to make the top ring of the anchor and the bottom arch with nods ending. Finished!
  3. Life buoy : Shape a donut from cotton rope with glue. Paint one popsicle stick with light blue and cut in four. Glue the four sticks each to the life buoy as shown on the picture. Finished!

Picture102

Super easy to make! Only using cotton rope and popsicle sticks! Great nautical ornaments for any coastal or beach theme diy projects. It would be a great ornament addition to a marine decor. That is why you should see my next nautical project for home decoration which perfect for summer or seaside decor.

Picture103

For more future posts, please follow me! And if you wanted to add my creations to your Pinterest board, please follow me on Pinterest! Also find me on Instagram!

Pinterest-iconImage result for instagram button

Picture104

And for creative fellow bloggers, don’t forget to join “You’re The Star” Blog Hop and link your posts every Monday! Starting June 2019, I will be co-hosting the blog hop and would love to see you there! Join and share the news!

Picture105

See you!

All you need is creativity!

Mel

Nautical Father’s Day Tag Card – Me And Dad

Have you plan something to do or a gift to your Dad on Father’s Day? A small gift with together time activity would be a great surprise on Father’s Day. A fishing trip or summer vacation by the beach would be an exciting gift for your Dad. Bring the surprise news with a bottle of wine or some beer bottles could lift more drama to the Father’s Day gift. For that idea, I made a Nautical Father’s Day Tag Card with the sentiment Together – Me and Dad; to spice up your surprise gift.

Picture93

Materials to have to make this Nautical Father’s Day Tag Card – Me and Dad are:

  • Kraft card
  • Popsicle stick
  • White acrylic paint
  • Blue acrylic paint
  • Red acrylic paint
  • Drawing pen
  • Glue
  • Silver ribbon

Picture95

How to make this simple Nautical Father’s Day Tag Card – Me and Dad to hang on your wine bottle:

  1. Cut a tag card 4 x 6 inches (10 x 15 cm) from kraft card.
  2. Draw a ship wheel and an anchor with a rope tilting around and connect to the words ” me and dad” .
  3. Paint the tag card with white acrylic paint effortless. Let it dry.
  4. Bold the drawing with drawing pen.
  5. Paint the ship wheel and the anchor with blue acrylic paint.
  6. Paint the rope with red acrylic paint.
  7. Write the word “Me and Dad”.
  8. Write the word “together” on a cut popcicle stick and glue it to the tag card.
  9. Punch a hole on top of the tag card and tie a silver ribbon bow.
  10. Tie your “me and Dad” tag card to a bottle of wine on Father’s Day and spent some time together.

Picture96

This Nautical Father’s Day Tag Card – Me and Dad might be a great addition to a more meaningful gift for your Dad. Have a great Father’s Day!

For more future posts, please follow me! And if you wanted to add my creations to your Pinterest board, please follow me on Pinterest! Also find me on Instagram!

Pinterest-iconImage result for instagram button

And for creative fellow bloggers, don’t forget to join “You’re The Star” Blog Hop and link your posts every Monday! Starting June 2019, I will be co-hosting the blog hop and would love to see you there! Join and share the news!

Picture94


See you!

Stay Creative!

Mel

I entered challenges:
  1. Craft Rocket Challenges – Summer Is Coming
  2. If You Give A Crafter A Cookie

How To Make Painted Farmhouse Burlap Ribbon Bow

Today I want to show you on how to make painted farmhouse burlap ribbon bow. This is not just saving some money to buy fancy patterned burlap ribbon, but to have a personalized pattern of the burlap ribbon too. How great it is if you can match the pattern you painted on the burlap ribbon bow with the project that you wanted that needs some burlap bow. You don’t have to buy so many burlap ribbon with different pattern, you just need to paint it as desired.

Picture44

There are a few things you still need to prepare to make farmhouse burlap ribbon bow, although it’s a very simple project; which are:

  • Natural burlap (stiff type and soft type)
  • White acrylic paint
  • Natural burlap rope

Picture43

How To Make Painted Farmhouse Burlap Ribbon Bow by yourself? Let’s check out these steps:

  1. Cut the stiffer natural burlap in the size of desired ribbon, mine was 1.5 inches (4 cm)
  2. Cut the softer natural burlap in the size of desired ribbon, mine was 3 inches (around 8 cm)
  3. Paint the stiff burlap ribbon with desired pattern, mine was geometric pattern that matches the diy project I made which was crossed wire on DIY Farmhouse Sign Wire Rack. Paint by using white acrylic paint. Let it dry.
  4. Tie the soft burlap ribbon into a bow by using natural burlap rope.
  5. Tie the stiff burlap ribbon into a bow by using natural burlap rope.
  6. Tie together the soft and stiff burlap bow with natural burlap rope. Secure it!
  7. Finished! Now you have your own fancy farmhouse pattern burlap ribbon bow.

Picture45

Easy to make with amazing result, paint it or stamp it, you can choose your best trick to make this Painted Farmhouse Burlap Ribbon Bow. Got inspired? I hope you do and try your own patterned painted burlap ribbon bow in farmhouse style! Happy trying and Happy Mother’s Day!

Picture34

See you!

Make yourself creative!

Mel

Easy Handmade Coasters Gift For Mother’s Day

This can be a last minute easy handmade project to make as a gift for Mother’s Day. A simple handmade gift just to bring a smile to your mom. Easy coasters made from popsicle sticks with a little panting and writing job.

What do you need to make easy handmade coasters as a gift on mother’s day:

  • Popsicle sticks
  • Glue for wood
  • Green, yellow, red, blue, white acrylic paint (mixed it to get pastel colors of blue, purple, green, yellow, pink).
  • Cotton rope
  • Kraft card in round shape.
  • Black brush pen

Picture46

Not many things to prepared to make this easy handmade coasters. Let’s go through the simple steps to do Mother’s Day gift coasters.

  1. Line up the popsicle sticks until the dimension is square.
  2. Give structure to the line of popsicle sticks.
  3. Draw a circle and a little heart. Paint the circle with each color paint you have prepared. Leave the love shape area from painting. Let it dry.
  4. Write the word “Mom” with brush pen. Let it dry.
  5. Paint the circle Kraft card with white paint and write “Happy Mother’s Day” with drawing pen.
  6. Punch a hole on the card and tie it to the set of handmade coasters with cotton rope.
  7. Your handmade Mother’s Day gift is ready. I keep it simple but if you want to add more ornaments to the gift card, feel free.

Picture49

You can change the colors with your mom’s favorite color. I prefer pastel colors because it looks so soft and goes well with the wooden popsicle sticks. Well, have fun making the handmade coasters for Mother’s Day gift!

For more inspiration on Mother’s Day gift, check Super Quick & Easy DIY Flower Vase For Mother’s Day Gift.

Picture47

See you!

Happy creative Mother’s Day!

Mel

Picture48

Challenges I entered for the handmade Mother’s Day gift coaster:

  1. A Bit More Time To Craft – AG
  2. Altered Eclectics – AG
  3. Love To Craft – AG
  4. A Perfect Time To Craft – AG
  5. My Time To Craft – CAS
  6. Everybody Art Challenge – Wood

Mystery Blogger Award

It took me a while to post this because I need time to think of the answers, questions and the nominees. I have been nominated for my first Mystery Blogger Award by Ribana from her wonderful blog Popsicle Society. Thank you so much Ribana, I’m still excited about it, really appreciate it! So, please drop by her blog and check out her fruitful posts around travels, food and anything that’s going on in her interesting life.

Picture38

What is Mystery Blogger Award?

Mystery Blogger Award” is an award for amazing bloggers with ingenious posts. Their blog not only captivates; it inspires and motivates. They are one of the best out there, and they deserve every recognition they get. This award is also for bloggers who find fun and inspiration in blogging; and they do it with so much love and passion.
– Okoto Enigma

The Rules of the Mystery Blogger Award

  1. Put the award logo/image on your blog
  2. List the rules
  3. Thank whoever nominated you and provide a link to their blog
  4. Mention the creator of the award and provide a link as well
  5. Tell your readers 3 things about yourself
  6. You have to nominate 10 – 20 people
  7. Notify your nominees by commenting on their blog
  8. Ask your nominees any 5 questions of your choice; with one weird or funny question (specify)
  9. Share a link to your best post(s)

Three Things About Myself

Hmm, three things about myself; a mom and wife, loves to design and create, dog lover.

For my best post, I love all my posts of course, so I share one for each category; categories that describe most about my blog and most featured posts.

Ribana’s Questions:

  1. Do you prefer cooking at home or eating out? Both!
  2. Where would you like to travel? Europe
  3. E-books or paper books? Neither both
  4. Are you singing in the shower? Sometimes
  5. Sea or mountain? Mountain

My questions:

  1. Are you a morning or a night person?
  2. Favorite flowers?
  3. What color scheme do you prefer for your home?
  4. What style for home do you love most?
  5. Silly things you do on your daily ritual?

My nominees for The Mystery Blogger Award in no particular order:

Thank you again Ribana for nominating me Mystery Blogger Award, I have carried the torch and handed to the awesome nominees. I have another torch to be passed, I will post it soon. Hope you guys enjoy my answers and my best posts. If you need to know on other type blogger awards, check out Sunshine Blogger’s Award, Liebster Award, Blogger Recognition Award.

See you!

Stay true to creativity!

Mel

Easter Kids Craft Tissue Roll Bunnies

Easter Kids Craft Tissue Roll Bunnies


Easter is coming next month, inspirations and ideas are the important things right now to prepare memorable Easter, especially for the kids. For that, I have an idea to share with you all, easy, cheap and fun Easter kids craft. Let’s make Easter Kids Craft Tissue Roll Bunnies!

Picture96

A few things that you need to prepare for this easy Easter Kids Craft Tissue Roll Bunnies :

  • Tissue rolls
  • Green, blue, red acrylic paint mixed with white ( to get the pastel look of light blue, green and pink)
  • Paint brush
  • Drawing pen
  • Wrapping paper scraps
  • Glue

Picture94

Let’s go through the easy steps to Easter Kids Craft Tissue Roll Bunnies :

  1. Sketch the bunny ears on the tissue rolls, front and back of the roll.
  2. Cut the ears shape both front and back of the roll.
  3. Paint each bunny roll with light blue, green, and pink. Let it dry.
  4. Draw the eyes, nose, mouth and feet of the bunnies. Paint the nose pink.
  5. Cut some wrapping paper scraps into the inner bunny’s ear and glue it to each bunny’s ear.
  6. Finished! You can add eggs, treats, flowers, anything relates to Easter or anything your kids would love to add.

Picture95

Aren’t those bunnies cute? Easy, quick, cheap and fun to do with your kids, it’s a perfect craft to make on Easter. I’m sure you have lots of tissue rolls at home, so it wouldn’t be difficult to do this Easter craft. I have some more Easter DIYs / crafts ideas you might like to see from my older posts; DIY eggshell Easter Card and Easy and Cheap DIY Easter Decoration From Plastic Surprise Eggs; and more on future posts, so follow me! And if you wanted to add my creations to your Pinterest board, please click this “P” button bellow to visit me on my Pinterest!

Pinterest-icon

Picture97

See you again!

Hello spring  creativity!

Mel

Picture98

I entered some challenges for my Easter Kids Craft Tissue Roll Bunnies to:

  1. International Art & Soul – Green and 2 Other Colours
  2. More Mixed Media Challenge – “Anything Goes” + optional Green
  3. Crafty Creations – Anything Goes
  4. Lil Patch Of Crafty Friends – Anything Goes

DIY Towel Cake & Towel Swan For Bridal Decor

DIY Towel Cake & Towel Swan For Bridal Decor

Picture48.jpg

I love bridal decor, so feminine, so sweet, so elegant, mostly white or ivory; all those things that I like. So, on this post I would like to share my DIY creations of towel cake and towel swan.

Pinterest-icon

Picture44

Maybe one of you who read this, is about to celebrate the most important day in her or his life and you happened to search for bridal decor inspiration. Well, I tell you, towel creations are one of the perfect decor for your bridal room. Why?

  1. It’s an easy DIY to make, especially the swan towel, super easy! By DIY you can save more money, rather than you have to pay someone else to make it for you.
  2. Not expensive materials would already do a perfect towel cake or towel swan. I did it with only ivory towels, some plastic flowers, ribbons, pearls and sewing pins.
  3. And the best part is you don’t have to throw the bridal decor after the ceremony, because you can use the towels and keep the ornaments for other craft purposes. Nothing to waste!

Picture45

You may also have more creations that you would like to make, since I only gave my two creations that I have made in the past; the bridal towel cake and the towel swan. And you can even make it more spectacular than mine, since you have seen mine and be inspired. This DIY towel cake and towel swan would be also perfect to be combined and incorporated with other bridal decorations to have more complex bridal decor. Well, I hope you get inspired in this month of love!

Pinterest-icon

Picture46

Stay lovely and creative!

See you!

Mel

Picture47

DIY Fall Cork Coasters – Super Easy

DIY Fall Cork Coasters – Super Easy

Like I have mentioned on my older post that I bought a defected cork plate mat with a very good discounted price. And the great thing was the defects are so minors, just a little tear and chips. So, I used the cork mat into some diy crafting projects, first was Dog Ornaments and then some scraps to decorate multipurpose holders . And on this occasion is fall coaster!

You just need a cork mat, a drawing pen and scissors. That’s it! Hmm, and of course a little design for the image you need to create for the coasters.

Picture7

Super easy to do coaster, yes it is. How?

  1. Just cut a 3 inches x 3 inches cork mat in a shape of beveled square.
  2. Made three pieces or more as you like.
  3. Draw a significant fall symbol in each coaster. I chose a pumpkin, a leaf and an acorn for my three cork coaster. You can have it stamped instead of drawing if it’s more convenience to you.
  4. Finished! Diy fall cork coasters are ready for fall theme tea time.

Picture8

I love the simplicity of it, just a cork character meets a black ink which produced a fall cork coasters with the fall symbols. Easy, simple and cheap!

Do you have more fall symbols in your head? Well then throw it on your own diy fall cork coasters and be creative with it. And meantime, I’m going to work on new other diy project. As soon as I finished, I will definitely share it with you, so stay tune with me and follow me for more… .

Picture9

See you again!

Easily creative!

Mel

I entered challenges for this diy coasters :

  1. Stinkin’ Inkers – Leaves are falling
  2. That’s Crafty – Forever autumn challenge
  3. Love To Craft – September anything goes
  4. Creatalicious – Anything goes
  5. Crafting With An Attitude – Anything goes
  6. Corrosive Challenge – Anything goes

DIY Dog Ornaments From Cork Plate Mat

DIY Dog Ornaments From Cork Plate Mat

Recently, I bought some defected cork plate mat with a very good discounted price. The defects are considered very minor, only little chip and torn here and there. I know one day I can use it for some DIY projects. And for today project is dog ornament.

This little dog ornaments from cork plate mat can be used as little coaster, decorative ornaments, key chains, hang decoration, and many more. I have not decided yet what to use these dog ornaments are for.

Materials I used to make these dog ornaments are only :

  • 1. Defected cork plate mat
  • 2. Drawing pen
  • 3. Scissors

Picture1

It is very easy to make just following these steps below :

  1. Determine the size and shape of the ornaments and sketch it into the cork mat. Mine is around 3 inches in diameter and have a shape of circle.
  2. Cut out the ornament cork mat.
  3. Draw the cut out circle cork mat as you desired. I drew 3 types of dogs, a friendly bulldog, a motherly Spaniel and two yorkshires; one is a bright little yorkie and the smaller one is a cute girly yorkie. If you have trouble with drawings, trace a printed dog image you wanted on the cork mat, then enhance the drawing with better fine lines.
  4. Draw a line along the circle to frame the image on the cork mat.
  5. The dog ornaments are ready! So simple and easy! Just made of defected cork plate mat only.

Picture2

Let’s see what I’m going to use those ornaments are for. I still have to figure out something for that. Well, until then follow me for more DIYs.

Pinterest-icon

Picture3

Follow me and get inspired and get creative!

See you!

Mel

I enclosed this dog ornaments project on :

  1. Sunny Day Crafting – Animal Project
  2. 613 Avenue Create – Clean & Simple
  3. 4 Crafty Chicks – Anything Goes
  4. Love To Craft – September Anything Goes
  5. A Perfect Time To Craft – Always Anything Goes
  6. Creatalicious – Anything Goes

DIY Word Puzzle From Art Foam Sheet To Help Kids Learn To Spell

DIY Word Puzzle From Art Foam Sheet To Help Kids Learn To Spell

Kids usually need fun way to learn something. In this case, learn to spell. Some learn the fun way of spelling from songs, books, and so on. Here, I use word puzzle to teach my kid learn to spell. By, solving the word puzzle over and over, the letters that create the word will automatically recorded in your child’s mind, without even realizing it. For that, I came out with the idea of making my own diy puzzle, so I can choose any words I want my kid to learn the spelling. I chose the art foam sheet because it is easy to cut, elastic so it’s quite durable and comes in many colors.

What things to prepare to make diy word puzzle from art foam sheet :

  • Colorful art foam sheets
  • Glue
  • Cutter
  • Pencil

Picture41

Steps to make word puzzle to help kids learn to spell :

  1. Determine words and object that you wanted to make for the puzzle. I chose the words “MOMMY” and “DADDY”.
  2. Select the colors of the art foam sheets and cut it into sizes that you desired in three sheets. Mine is around 30 cm / 12 inches times 7 cm / 3 inches and I used green, purple, and brown art foam sheets.
  3. Sketch the letters of each word on the cut art foam sheet. and add an object to make it interesting. I made star for “DADDY” and flower for “MOMMY”.
  4. Cut the sketched letters and objects carefully.
  5. I made it into two-sided puzzle to save the foam sheets. So, glue together the cut “DADDY” (brown) and plain foam sheet (brown) and the cut “MOMMY” sheet (green) like sandwich. Let it dry.
  6. Copy the letters of cut-out “MOMMY” with flower and “DADDY” with star into other art foam sheets with different color. I had “MOMMY” in purple and “DADDY” in green. This is to have more thickness to the letters and objects so it will pop out and easier to be taken off and put it back on.
  7. Then glue the cut-out letters and objects together and let it dry.
  8. Glue back on the cut-out holes from letters, in my case are the letter D, A, O; onto the art foam sandwich. Let it dry.
  9. Now, put back all the letters and objects where it belongs like you are solving a puzzle.
  10. The word puzzle from art foam sheets is ready! and you do it yourself! Now, it’s time to help your kids learn to spell and have fun!

Picture42

This would be a great activity and learning time for your kids, especially kids who love solving puzzles. You can get creative with the words and objects and the colors, like your child’s name with his/her favorite colors and shape.

I add the glitter star on “DADDY” star and flower ribbon on “MOMMY” flower to make it more interesting for kids. Anyway, this is a very easy and cheap project to do, but the value is high because it helps your kid to learn to spell and also play with puzzle, fun learning! So, have fun trying!

Picture43

Spell “CREATIVE” !

See you!

Mel


Note: I entered below challenges for this project :

  1. 4 Crafty Chicks – Out of this world/space
  2. Crafty Friends – Anything goes
  3. Crafty Creations – Anything goes
  4. Love To Craft – Anything goes
  5. Craftaholics – Anything goes

Handmade Pink Orchid And Gold Birthday Card

Handmade Pink Orchid And Gold Birthday Card

My mom’s birthday is coming soon, therefore so I already prepared myself with handmade birthday card for her. Last time I made a card for her was on mother’s day with hydrangea card. Besides hydrangea as her favorite, orchid is also her favorite flower.

Before this project, I have made an artwork paper of pink orchid with the shade of gold. I used that image to make this birthday card. Let me show you the list of things that I had for the handmade card.

  1. Pink orchid artwork paper
  2. Pink satin ribbon
  3. White lace
  4. Gold stone stickers as a charm
  5. Light yellow Concorde paper
  6. Upcycle card paper
  7. Glue
  8. Scissors
  9. Drawing pen

Picture37

I made this handmade card in a classic look with two dominant colors, which are pink and gold. And this orchid birthday card is simple because i wanted the pink orchid to be the star and take stage.

Picture38

I hope you guys enjoy my handmade gold birthday card I made with pink orchid hand drawing. Maybe it will inspire you to make your own handmade card with hand drawing or other project with orchid as an object.

Picture39

I entered my handmade pink gold birthday card to :

  1. Cardz 4 Galz – 
  2. Make My Monday – Oriental
  3. Card Mania – Anniversary
  4. Let’s Create – ANYTHING GOES + option LOTS OF LAYERS
  5. Simon Says Stamp Monday – Tape it up
  6. Craftaholics R Us – Yellow
  7. Cute Card – Charms
  8. Craft Dee Bowz – Anything Goes and include a HANDMADE BOW
  9. Tuesday Throwdown – Anything goes
  10. Crafty Friends – Anything goes
  11. Aurora Wings – Anything goes
  12. Dare To Be Artzy – Anything goes
  13. A Bit More Time To Craft – Anything goes
  14. Crafty Creations – Anything goes
  15. The Corrosive Challenge – Anything goes August
  16. 613 Avenue Create – Anything goes

Picture40


See you!

Make creative handmade!

Mel