You’re The Star Blog Hop – Easter Joy

Hello and welcome to You’re The Star Blog Hop Easter Joy Creative Features! Find many wonderful ideas and tips on Home Features! Please share your ideas too, by linking up your inspiring posts. Visit the blogs and get more stories behind it. And by clicking the CLICK HERE on below post, you can link your posts and able to find more other linked posts about fantastic recipes, beautiful home decor, DIYs, creative tips, family posts and gardening on this party! Tons of ideas from different fantastic bloggers who have linked their amazing posts.

Congratulations to all featured bloggers, very inspiring posts! If you want your inspiring posts to be featured too, please join the link up! Old and new post as long as it’s new in You’re The Star Blog Hop. Find the link up button at the end of this post! Your linked posts will be visible to all hosts / co-hosts’ blog and each week will be a themed feature which selected by co-host of the theme; I’m in Creative Week, so together with other creative co-hosts; I’ll be choosing creative bloggers who link up here to be featured on Creative Week every month.

Then, what are you waiting for? But before we go to the party, let me share my post.

DIY Spring 3D Gift Can

 
by Angie Ouellette-Tower for http://www.godsgrowinggarden.com/ photo YoureTheStarHopLarge_zpsjbrldhcx.jpg

WELCOME to the second week of the April 2023 You’re the Star” Blog Hop!
_____________________________________

WELCOME to CREATIVE feature week of the April 2023 You’re the STAR” blog hop!
Meet your CREATIVE week Hosts 

 
YoureTheStarCreative
This week is CREATIVE feature week

Swing by the Creative hosting Team’s blogs:


Colleen @ Butterfly in the Attic
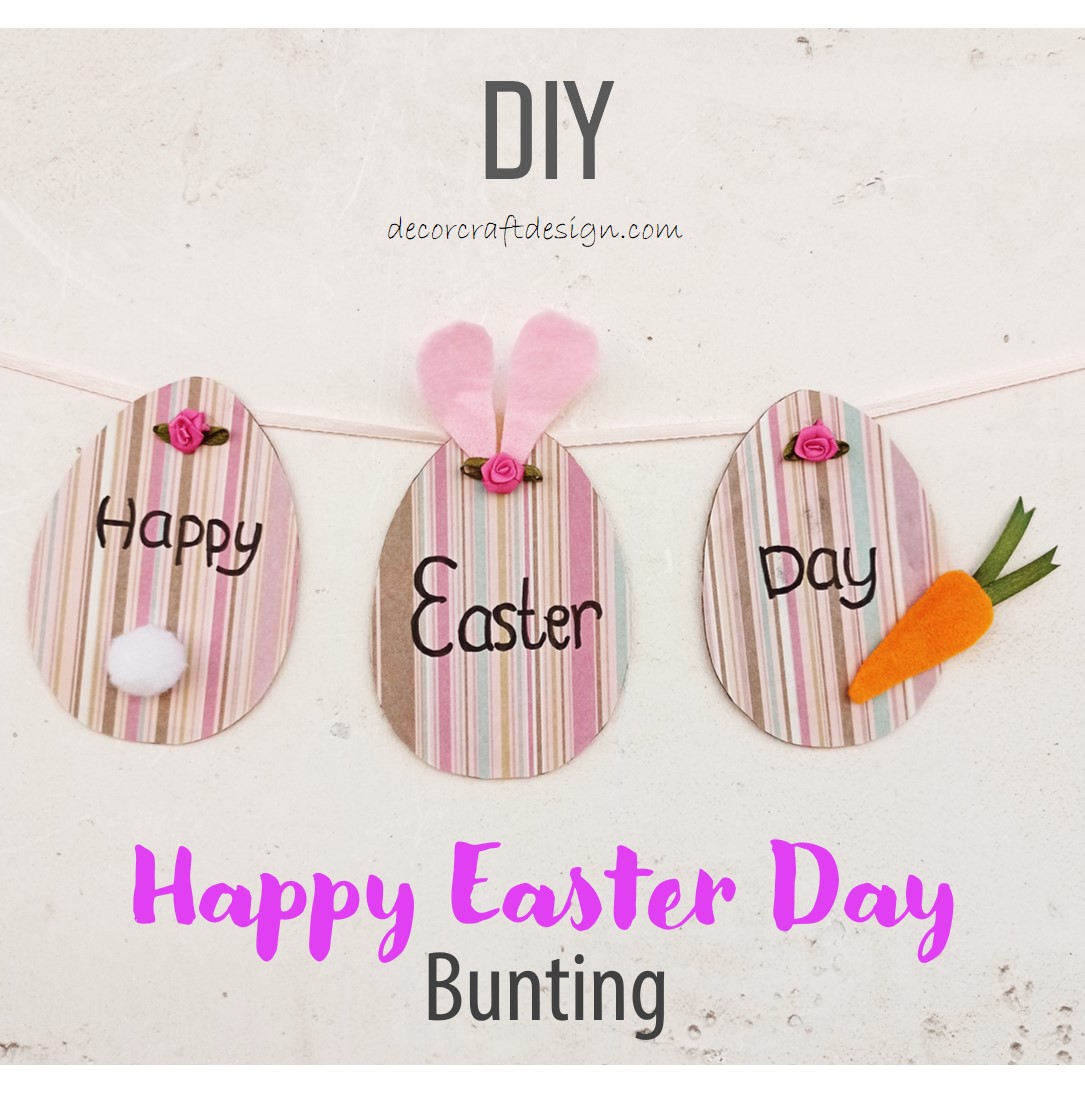
Mel @ Decor Craft Design


This is a month long Linky party featuring YOU!

There will be 4 different features each week and 4 different feature categories.  Just to be clear – this is NOT a themed party – you may link up ANY family-friendly blog posts any day of each month. 
The “theme” occurs in our weekly features:
WEEK#2 CREATIVE – arts & crafts, music, writing &/or dramatic arts (this can include sewing, yarn work, dance, art history, handmade jewelry, painting, computer art, fashion etc – anything creative while remaining family friendly)

by Angie Ouellette-Tower for godsgrowinggarden.com photo ShopHoppingFeatured_zpsf9fab123.jpg
(These features were chosen from the March 2023 “You’re the Star” blog hop)

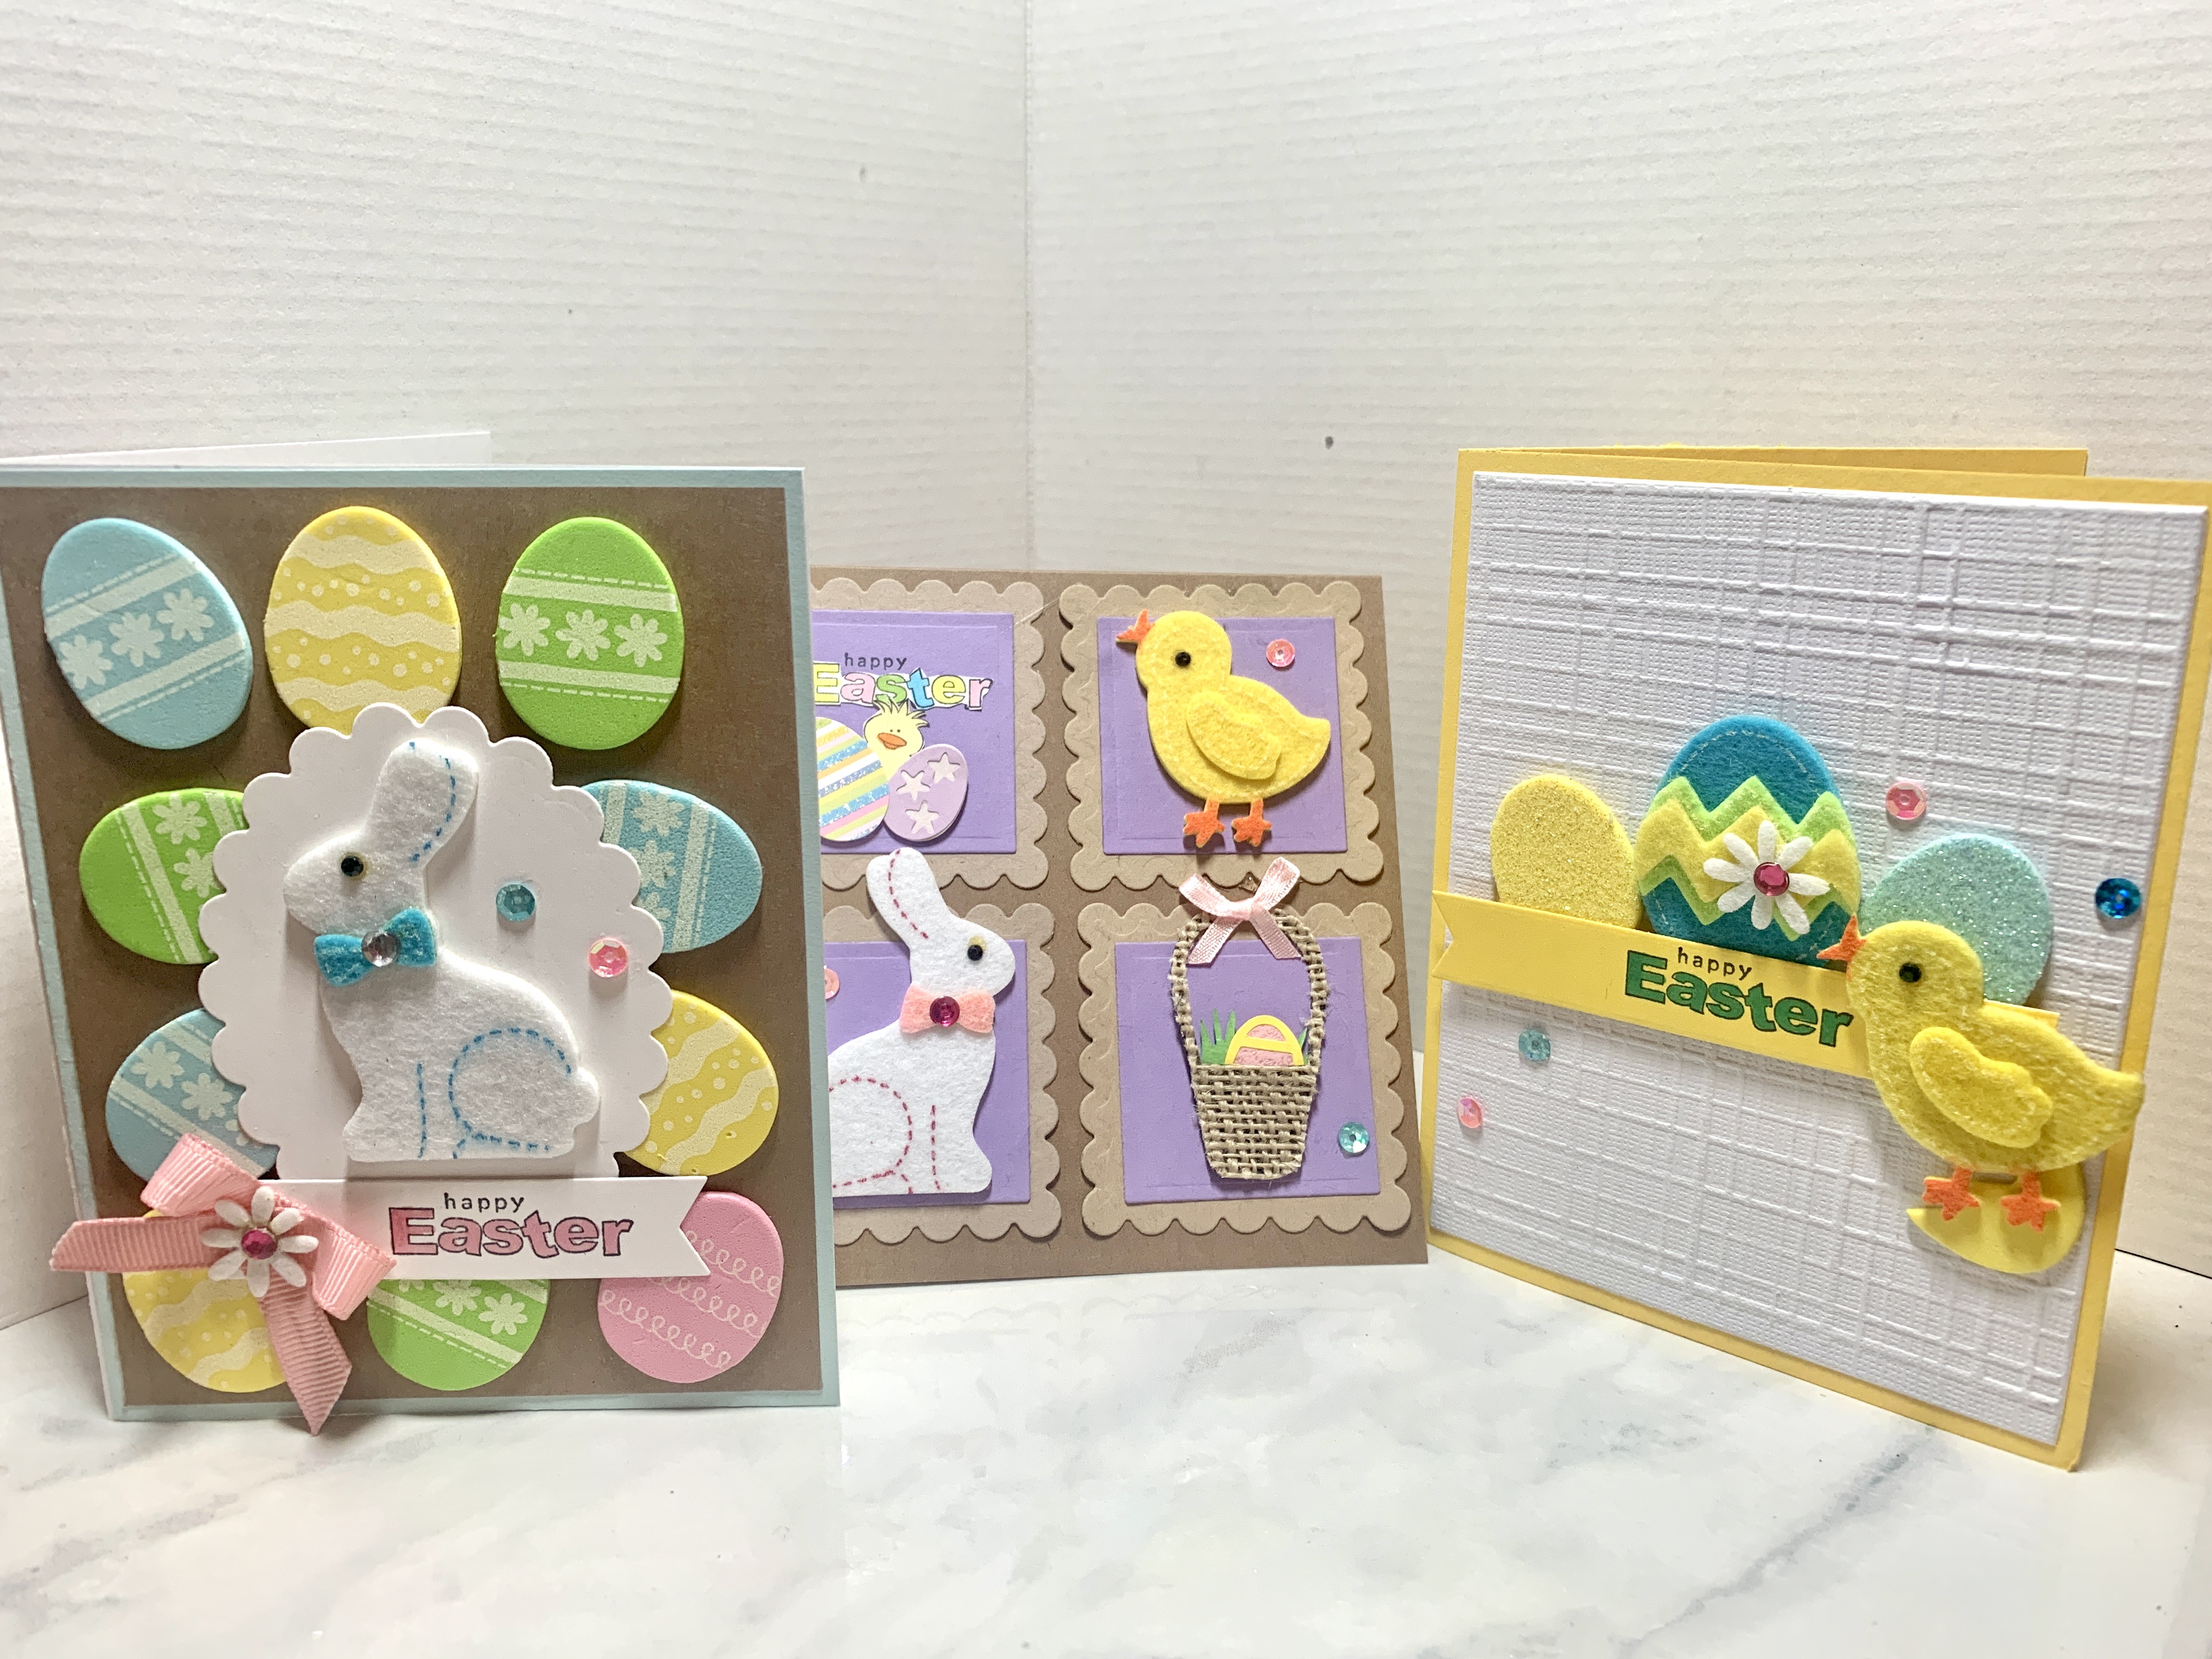
Handmade Easter Cards for Children by Amy’s Creative Pursuits


dye eggs with ties


If you’ve been featured then please grab a STAR button below:


by Angie Ouellette-Tower for http://www.godsgrowinggarden.com/ photo YourAstarFEATURED_zpspebobflc.jpg
 

*******************************************************
photo STARhosting_zpsqbwlkopx.jpg

******************************************************

All Hosts/CoHosts will post this blog hop on every Monday of each week.
Please link up your family friendly blog posts below!
It wouldn’t be a linky party with YOU!
(IMPORTANT NOTE: by linking up you understand that you might be featured next month and if so, we will use some of your photos from your post – rest assured – we will always link back to your lovely blog.  We might also share your fantastic posts on social media.  Also, you may link up as many family-friendly posts as you like & YES – other blog hops &/or giveaways are welcome {giveaways and blog hops will NOT be featured though}  Thank You & ENJOY! )

Powered by Linky Tools

Click here to enter your link and view this Linky Tools list…

Don’t forget to stop by Home Matters Linky Party

Don’t forget to stop by Happiness Is Homemade Link Party

Thank you for linking up! For more of my future Spring posts, please follow me! And if you wanted to add my creations to your Pinterest boards, please follow me on Pinterest! Also find me on Instagram and Twitter

See you soon!

Link up your creativity!

Happiness Is Homemade Link Party #423 Happy Easter

Welcome to Happiness is Homemade! Happy Resurrection Sunday! I hope that you’re all having a blessed and joyous Easter. Let’s check out this week’s features.

This Week’s Features

Maryjo from Masterpieces of My Life created this beautiful Easter tablescape, which is so pretty! Check out the post where she shares how to create these adorable faux chocolate Easter bunnies.

Gail from Purple Hues and Me made this beautiful spring tray using wrapping paper. Her tutorial will show you how to upcycle plastic trays into pieces that perfectly fit your home. I saw some trays and beautiful wrapping paper at Dollar Tree that would be perfect for this project, so you could make a customized piece for $2.50!

In her post Kristin of White Arrows Home shared 9 ways to make your Easter celebration special. There are some great ideas in the post, including an adult Easter basket, resurrection eggs, and the reason that lilies are used to represent Jesus during the holiday.

Our own Mel over at Decor Craft Design made these adorable felt carrots that can be used in so many ways: in garlands, on wreaths, tiered trays, kids’ crafts, and so much more!

To end our Easter Sunday link party features, we have these adorable bunny butt cookies that you can make easily with your kids. No baking is required as you will be using all store bought ingredients, including pre-made cookies. I plan to try this out on Saturday as a fun activity for the kids that will give us easy Easter dessert.

MEL’S PICK OF THE WEEK

ANTIQUE DRESSER IN OCEAN COLORS & COPPER

Thank you for joining us this week whether you are a blogger sharing your latest posts OR a reader enjoying all of the inspirational shares!   Don’t forget to drop by and say hello to all our hostesses, they always appreciate your visit! Here are all of our hostesses at Happiness Is Homemade!

Linda @ A Labour of Life

Sinea @ Ducks ‘n a Row

Beverly @ Eclectic Red Barn

Katie @ Love My Messy Messy Mess

Mel @ Décor Craft Design

Niki @ Life as a Leo Wife

Would you like to be a part of Happiness Is Homemade? We are looking for hostesses to join our team. If you are interested, please email any one of the Happiness Is Homemade hostesses and let them know. We would love to have you join our party!

You are invited to the Inlinkz link party!

Click here to enter
https://fresh.inlinkz.com/js/widget/load.js?id=a8b40ada7693d64e5923

Thank you for linking up! For more of my future Spring posts, please follow me! And if you wanted to add my creations to your Pinterest boards, please follow me on Pinterest! Also find me on Instagram and Twitter

See you soon!

Link up your creativity!

Home Matters Linky Party #374

Welcome to the weekly Home Matters Linky Party.

A great place to come, share your blog posts, and make new friends.

We are so glad you are here with us each week.

Before we start the party, let me share my latest projects:

DIY Happy Easter Day Bunting

A cute Easter egg and bunny bunting that you can make with your kids and have fun with.

HMLP 2022

Meet the hosts!

donna powell host

Donna @ Modern On MonticelloFacebook | Twitter | Pinterest | Instagram

Mel @ Decor, Craft, DesignTwitter | Pinterest | Instagram

My feature picks this week!

Learn How to Design Your Own Home Coffee Bar by Decorative Inspirations

DIY Bicycle & Butterfly Wreath by Artsy Fartsy Mama

DIY Denim Bunny Decoration From Jeans Scraps by Pillar Box Blue

BONUS PICK

Chocolate Pudding Peeps by Walking On Sunshine Recipes

Home Matters Linky Party Guidelines:

  1. Please link up no more than THREE posts each week–try to make sure that they are new links that you have not shared here previously.
  2. Please take some time to poke around and visit some of the other links.
  3. Please take some time to check out your hosts and co-hosts on social media.
  4. We appreciate the variety of blogs on the www; however, the Home Matters Party is for links on matters of the HOME. Please link accordingly.
  5. We ask that you do not add other Linky Parties, Blog Hops, or Giveaways–unless you begin the party with a new project, recipe or post.
  6. On the same note, please do not add links of an extremist, political or strong controversial nature. (The hosts and co-hosts read each and every blog post linked and will contact you directly if you have linked something that does not fit into the realm of the party.)

With your help, we can continue to grow the Home Matters Party! Thank you!

We are looking for Co-Hosts. Help us Rock this party!
If you are interested, please contact Donna at radforddesignstudio@gmail.com.

You are invited to the Inlinkz link party!

Click here to enter and view

By joining the Home Matters Linky Party you are giving permission for all hosts and co-hosts to use and share any part of your post, including pictures, for party promotion, as featured posts, in party photo collages, on blogs, and across social media, etc. All credits will be given to the original source.

Thank you for joining in the fun and excitement at the Home Matters Linky Party. We hope you enjoy it as much as we do. We look forward to chatting with you in the comments.


Thank you for linking up! For more of my future Easter andSpring posts, please follow me! And if you wanted to add my creations to your Pinterest boards, please follow me on Pinterest! Also find me on Instagram and Twitter

See you soon!

Link up your creativity!

DIY Happy Easter Day Bunting

A bunting for every occasion is surely can light up the festivity. That is why I share this DIY Happy Easter Day Bunting with a shade of Easter eggs and a bunny. It’s super easy, easy and cheap supplies and of course super cute. This Easter eggs and bunny bunting would be a great DIY Easter projects you can make with your kids and have fun with.

Things To Prepare

I made this Happy Easter Day bunting from my scraps collection. From the felt, cardboard to the ribbon; everything came from my stash. Anyway, let’s see what are the short list supplies used to make thisDIY Happy Easter Day Bunting :

  • cardboard
  • wrapping paper (pink shades with lines pattern)
  • pink ribbon flower ornament
  • pink felt
  • Orange felt
  • Green ribbon
  • white pom pom
  • Pink ribbon
  • Black marker
  • Glue

How To Make

This bunny bunting is easy to make, so you can make lots of them into longer Easter bunting as you need. All you have to do is gather all the supplies which I’ve mentioned above and follow these easy steps on how to make DIY Happy Easter Day Bunting :

1 . First, determine the size of cardboard eggs that you want. Mine is around 4inches tall. Cut the cardboard into shapes of an egg. I made 3 eggs.

2. Prepare the ornaments that you need like a white pom-pom for a bunny’s tail, carrot from orange felt and green ribbon, and last the bunny’s ears from pink felt.

3 .Back to the cardboard eggs for the Easter banner, paste them with patterned paper. Mine is pink lines. Let it dry.

4. Write Happy, Easter, Day on each Easter egg by using black marker.

5. Now, paste one by one the bunny’s ears, bunny’s tail, bunny’s carrot and finish it off with the pink flower ribbon on each egg.

6. Last but not least is to paste a pink ribbon rope to hang those Easter eggs into Easter bunting.

Super easy and quick Easter eggs and bunny bunting for Happy Easter Day. Be creative and playful with the egg’s patterned-paper. Have fun with the Easter bunting!

For more of my future Easter andSpring posts, please follow me! And if you wanted to add my creations to your Pinterest boards, please follow me on Pinterest! Also find me on Instagram and Twitter!

For creative fellow bloggers, don’t forget to join You’re The Star” Blog Hop, Happiness Is Homemade Link Party and Home Matters Linky! Link your inspiring posts (anything, from recipes, home decor, DIYs, crafts, family, health to gardening) every Monday and Sunday. Get a change to be featured! I’m one of the co-host of You’re The Star blog hop for Creative Week and Happiness Is Homemade; I will choose the creative posts to be featured on Creative Features week and on Happiness Is Homemade. Please come and join the blog hop and I would love to see you there! Please join and share the news!

Easy DIY Carrots

Right after welcoming Spring, Easter is coming soon. Remember my felt flowers I did a couple of weeks ago? I used my felt stash and I have a little piece of orange felt too. I think with its vibrant color, it would look great as carrots. From there, I think of making a spring carrots out of orange felt. It looks so cute as tiny carrots.

My felt carrots are super easy to make and quick too! You don’t even need a sewing skill to make these little carrots, you just need to have a needle and some orange thread. You can make this cute springy carrots for decorations like Easter bunting, Easter wreath, or many other Spring and Easter decorations. Anyway, all supplies that you need to prepare for this easy Easter DIY are super simple and short list. Let’s find out more!

Things To Prepare

Basically, it takes you only 4 simple things to make these cute Easter carrots. The size is up to you as how big you felt is, but I personally like the tiny carrot, it’s cuter. Anyway, let’s see what are the short list supplies used to make this EasyDIY Carrots :

  • Orange felt
  • Green ribbon
  • Needle and a matching color thread

How To Make

It’s easy to make, so you can make lots of them and use it for decorating other projects. Now, gather all the supplies which I’ve mentioned above and follow these easy steps on how to make Easy DIY Carrots :

1 . First, determine the size of carrots that you want or need to make. From there, you can decide the width and the length of the felt that you are going to use. Mine was around 1/2-3/4 inch width and the length was about 10 inches. It can make 2-3 inches long carrots.

2. Cut the orange felt in your desired dimension, then bend it from left to right, then right to left, over and over like a two-dimensional spring (zig-zag).

3 .Hold the spring shape and insert a thread with needle, start from the bottom carrot to the head of carrot. Fix the carrot shape, decide the length you want from your carrot by adjusting the springy felt.

4. Finish the carrot off with green ribbon on top which you have prepared before in a bow. Secure it by continue inserting the thread and tie a knot at the end of it. I left the thread longer to make a hanger, so I can hang my cute little carrots. Finished!

Super easy and quick way to make some Easter carrots decoration from leftover felt. You can use them for bouquets, wreaths, decorations and many more. Have fun with the cutie carrots!

For more of my future Easter andSpring posts, please follow me! And if you wanted to add my creations to your Pinterest boards, please follow me on Pinterest! Also find me on Instagram and Twitter!

For creative fellow bloggers, don’t forget to join You’re The Star” Blog Hop, Happiness Is Homemade Link Party and Home Matters Linky! Link your inspiring posts (anything, from recipes, home decor, DIYs, crafts, family, health to gardening) every Monday and Sunday. Get a change to be featured! I’m one of the co-host of You’re The Star blog hop for Creative Week and Happiness Is Homemade; I will choose the creative posts to be featured on Creative Features week and on Happiness Is Homemade. Please come and join the blog hop and I would love to see you there! Please join and share the news!

How To Make Coastal Easter Eggs Decoration

If your home is by the coastal area or you just love a coastal theme decor, why don’t you have your Easter decor this year in Coastal theme?! Coastal theme will bring some freshness to your Easter decor at home. With bright colors and some coastal ornaments, your Easter eggs decoration will look fantastic and fresh. Take a look at my Coastal Easter Eggs decoration and scroll more on how do I make it. It would be a great addition to your Easter Coastal decor.

How to make a Coastal Easter Eggs decoration? It is actually easy, you would only need three things for that; which are:

1. For the eggs, paint them in pastel colors, if you want to stress more on the coastal feeling, use blue a lot.

2. Add some beachy ornaments, like seashells, starfish, and so on.

3. Don’t forget to bring in some nautical ornaments, like anchor, ship wheel and many more.

With only that three elements, you can make a stunning Coastal Easter Egg Decoration. As easy as that! Well, if you still unclear, let me show you how I made my Coastal Easter Eggs Decoration.

Things To Prepare

This Coastal Easter Eggs decoration is a low budget Easter decoration. Use some eggshells and seashells an a tin can lid and you are ready for the project. Seashells and a tin can lid are used to make a seashells tray. And for the seashells tray, you can check out my post on how to make it. Anyway, here are the complete list of supplies that you need to prepare for this coastal Easter decoration :

  • Eggshells (I used chicken egg and quail eggs)
  • Fake moss
  • Acrylic paint in green, white, red, blue, yellow.
  • Black permanent marker
  • Seashells Tray

How To Make

This is a quick Easter decoration you can make in last minutes. Super easy to make too. You can make it into a large Easter decoration or a small Coastal Easter decoration, it’s all up to you. If you want to make a large one, use a bigger tray and more eggs. Mine, I made a small one which great for a coffee table decoration or mixed together with other Easter decoration which of course a coastal theme Easter.

1 .Make a hole on the bottom of the egg, very gently, to empty the egg. Wash all the eggshells and let sit for a while until it’s dry.

2 .Paint the eggshells in pastel colors of white, blue, green, yellow, and pink. How to get a pastel color? You can get it from mixing a color with white. By mixing a color with white, you will have a lighter and softer color. Let it dry after painting.

3 .I used my seashells tray I made before last year. You can check out how I made it; or if you have a round plain rustic blue tray, it will do too.

4 .Take some fake moss and arrange it on the tray, it would look as if it’s a bird’s nest.

5 .Don’t forget to draw an anchor by using a black marker on the white chicken eggshell.

6 . Place all the painted Easter eggs and arrange them nicely on the fake moss. Add some seashells and maybe starfish if you have one. And it’s done!

Super easy and quick to make isn’t? A Coastal Easter Eggs decoration that you can prepare in last minute. I also have an easy Easter Wreath I made last week, it’s an upcycled low budget Easter decoration that you will love to make. Well, Easter is still a week to come, better get moving and get your home ready for Easter decor.

You can check out more Easter ideas on Twinkl’s Easter Celebration, find it in Fun and Eggciting Ways to Celebrate Easter.

For more of my future Easter and Spring posts, please follow me! And if you wanted to add my creations to your Pinterest boards, please follow me on Pinterest! Also find me on Instagram and Twitter!

For creative fellow bloggers, don’t forget to join You’re The Star” Blog Hop and Happiness Is Homemade Link Party! Link your inspiring posts (anything, from recipes, home decor, DIYs, crafts, family, health to gardening) every Monday and Sunday. Get a change to be featured! I’m one of the co-host of You’re The Star blog hop for Creative Week and Happiness Is Homemade will choose the creative posts to be featured on Creative Features week and on Happiness Is Homemade. Please come and join the blog hop and I would love to see you there! Join and share the news!

See you!

Hello Creative Easter!

Mel

How To Make Easter Farmhouse Wreath

Decorating for Easter is just fun to do. From cute look to charming sophisticated style. Pick one style you like and have all Easter decorations in one theme. For those who loves simple farmhouse look, this is just an Easter wreath you would love to hang at your front door. It’s an easy Easter bunny wreath which use cardboard to make. Cheap and easy to make, and here I’m sharing the tutorial on how to make Easter Farmhouse Wreath from cardboard.

I made an interpretation shape of a bunny head. Mixed a rustic look of a cardboard with a shabby lace. All together is looking soft yet rustic. The Easter wreath is as simple as how it’s made. From the supplies to step by step tutorial, those are the things I’m going to share for the next phrases. So, stay scrolling down.

Things To Prepare

This Easter wreath is a low budget Easter decoration. Use any cardboard you have at home and you are good to go. Some other supplies are easily bought or even there in your shelves. So my Easter bunny wreath is just easy to prepare. Okay, take a note or just memorize this short list of materials you need to make a Easter farmhouse wreath :

  • Cardboard
  • Burlap
  • White lace
  • Burlap rope
  • White paint
  • Glue

How To Make

Seasonal decoration should not be too expensive, especially those that you wouldn’t want repeatedly use. Like for a wreath, just use some upcycled materials to make it, be creative and save some money. In that case, my Easter farmhouse wreath is just great Easter DIY for a low budget Easter decor. Let me describe step by step how I made this Easter bunny wreath with a farmhouse look:

1 .Cut a doughnut shape with a size around 9-10 inches diameter from a used cardboard. I made a mini Easter wreath, if you want a bigger wreath, just adjust the diameter and followed by the other elements. The doughnut thickness is around 1.5-2 inches.

2 .Cut a pair of bunny ears out of a cardboard. The height is around 8-9 inches, with below width of around 1 inch and upper width around 3 inches.

3 .Paint the doughnut cardboard as a bunny head with white paint. Make zig zag pattern with white color around the bunny head. Let it dry.

4 .Take some white lace, glue it around both cardboard bunny ears. Then glue the pair of lacey bunny ears on the painted bunny head. Let it sit for a while until the glue is firm.

5 .Make a burlap ribbon mixed with white lace and tie up the ribbon with burlap rope.

6 . Use the burlap ribbon to style the bunny ears. Glue it in the middle. Don’t forget to add some burlap rope a the back of the cardboard bunny head for hanger. And you’re done!

Simple farmhouse style for an Easter wreath made by yourself. Low budget and easy to make, that’s a great DIY to save some money but still makes your home looking pretty. Why not try make one yourself and share with me how’s your Easter farmhouse wreath look like.

For more of my future Easter and Spring posts, please follow me! And if you wanted to add my creations to your Pinterest boards, please follow me on Pinterest! Also find me on Instagram and Twitter!

For creative fellow bloggers, don’t forget to join You’re The Star” Blog Hop and Happiness Is Homemade Link Party! Link your inspiring posts (anything, from recipes, home decor, DIYs, crafts, family, health to gardening) every Monday and Sunday. Get a change to be featured! I’m one of the co-host of You’re The Star blog hop for Creative Week and Happiness Is Homemade will choose the creative posts to be featured on Creative Features week and on Happiness Is Homemade. Please come and join the blog hop and I would love to see you there! Join and share the news!

See you!

Hello Creative Easter!

Mel

Free Printable Easter Bunny Coloring

Easter is just next month, but the excitement of preparing decorations and activities to do for the celebration is lingering. And for kids, this holiday is one fun holiday with so many delighting things to do, like Easter egg hunt, helping with the Easter decorations, decorate Easter eggs and the list go on. To add more fun, I prepare an Easter Coloring page for you, moms, dads, teachers, grandpas, grandmas, everyone to download for free. Yes, Free Easter Bunny Coloring Printable!

I drew a cute bunny with lots of big Easter eggs in front. The Easter eggs are full of different kind of pattern for kids to have fun with the colors. Some flowers and a Happy Easter wording for fun coloring. I also add a name section below, so kids can add their name on it. When it’s done, it can go to the wall of fame at your home with their names on it. Or probably for school uses. You can also suggest your kids to cut the colored bunny and paste it on a card, which they can turn it into an Easter card, made by themselves. How fun is that? Then, what are you waiting for? Download my Free Easter Bunny Coloring page on below download button!

Download Free Printable

Please download and print my Free Printable of Easter Bunny Coloring page.  It’s in PDF to print and maximum size is A4 paper size. Enjoy the Free Printable!

CLICK BELOW TO DOWNLOAD!

You can also enjoy my other Easter printables, feel free to download !

Free Printable Easter Coloring – Bunny And Eggs

Free Printable Easter Coloring And Word Search For Kids

Fun Kids Learning Activity With Easter Themed Crossword Puzzle

And you may want to check out my Four Fun Ways To Decorate Easter Eggs Card For Kindergarten to have a different way of coloring an Easter printable which you can use it as a card.

For more of my future Easter and Spring posts, please follow me! And if you wanted to add my creations to your Pinterest boards, please follow me on Pinterest! Also find me on Instagram and Twitter!

For creative fellow bloggers, don’t forget to join You’re The Star” Blog Hop and Happiness Is Homemade Link Party! Link your inspiring posts (anything, from recipes, home decor, DIYs, crafts, family, health to gardening) every Monday and Sunday. Get a change to be featured! I’m one of the co-host of You’re The Star blog hop for Creative Week and Happiness Is Homemade will choose the creative posts to be featured on Creative Features week and on Happiness Is Homemade. Please come and join the blog hop and I would love to see you there! Join and share the news!

See you!

Hello Creative Easter!

Mel

Note : Please use the printable for personal use only, not to be sold, duplicated or modified in any form. And for sharing purposes, please share this link (for downloading the printable straight from Decor Craft Design site) instead of distributing it. Please contact me for further information.

Four Fun Ways To Decorate Easter Eggs Card For Kindergarten

I made an Easter Eggs Card with my kid as a free task from school for Easter activity. As for some small kids, coloring the whole page sometimes can be boring and tiring.  So, I came out with the idea of four different ways to decorate the Easter Eggs Card. Four fun ways that have already introduced to most kindergarten children. The four techniques are :

  1. Smudge Crayons Coloring
  2. Pencil Colors Coloring
  3. Origami Paper Mosaic
  4. Painting By Using Watercolor Pencils

These are four fun ways that will make your kids having a blast experience in decorating an Easter Eggs Card. Not boring, because it has so many ways and fun learning to enhance their artsy side. Plus, this kids activity would make the little ones able to explore many colors possibilities.

Picture119

Let me share how I do the Four Fun Ways To Decorate Easter Eggs Card For Kindergarten kids.

Smudge Crayons Coloring

Smudge Crayons Coloring means you need to use crayons and your thumb to do this. A bit messy on your fingers, but it’s surely fun and the result is fantastic. Here are what you have to do:

  1. Color the drawing with a contrast color crayon in thick layer.
  2. Use your thumb to smudge the crayon coloring by sweeping your thumb to the outer direction of the drawing. And you got yourself a shinny looking crayon coloring.

Pencil Colors Coloring

This is the most familiar coloring way for every kids and adults. It’s super easy and no mess at all. Use bright vibrant colors to color the Easter Eggs and have a spirit of Easter and Spring.

Picture116

Origami Paper Mosaic

Playing with colorful origami papers with shredding and glue involved is surely a favorite for every young kids, including mine. This is not coloring, is more to the crafty work. Here are the simple steps of origami paper mosaic:

  1. Shred the origami papers in many colors in small pieces. You can cut it, but what’s the fun?
  2. Glue the small pieces of origami papers into the drawing until no more white area is left. Let it dry.

Painting By Using Watercolor Pencils

Painting by using watercolor pencils is the easiest for kids to try painting. It’s much as fun as painting by using watercolor paste. And it less messy too! What do you need to do?

  1. Use a watercolor pencils set, usually it comes wit h a paint brush.
  2. Prepare a clean water on a cup to wet the paint brush.
  3. Color the drawing with watercolor pencil colors.
  4. Stroke the colored drawing with the wet painted brush.
  5. Dip the paint brush into the water every time the brush gets too dry or every time you wanted to paint a drawing with a different color from previous one. Let it dry.

Picture118

Very easy and fun, right? You just need to prepare an Easter Eggs drawing or printable (it’s available on my other post, check below posts) and you can have your kids to experiment with the Four Fun Ways To Decorate Easter Eggs Card.

It doesn’t have to be a perfect art work, it’s just a fun project for kindergarten kids to do on Easter at home with their parents or older siblings. These four fun ways to decorate Easter Eggs Card would a great learning and creative experience to young children and adding their colors vocabulary. Well, have fun with this Easter for kids project and Happy Easter!

Check out my other fun kids activities, free printables and Easter posts!

Picture117

For more of my future Spring posts, please follow me! And if you wanted to add my creations to your Pinterest boards, please follow me on Pinterest! Also find me on Instagram and Twitter!

Pinterest-iconImage result for instagram buttonRelated image

For creative fellow bloggers, don’t forget to join “You’re The Star” Blog Hop ! Link your inspiring posts every Monday and get a change to be featured! I’m one of the co-host of the blog hop for Creative Week and will choose the creative posts to be featured on Creative Features week. Please come and join the blog hop and I would love to see you there! Join and share the news!

See you!

Happy Creative Easter!

Mel

DIY Easter Eggs From Polymer Clay For Kids Activity

I just found this polymer clay that my kid love to play with so much. The texture is different from usual clay, it’s more elastic and moist. So, it’s easier to form a figure and less messy to play with than the usual one. The great thing is, by the time it’s dry enough, it would be squishy but still maintaining its former form. And at the end it will as hard as a board foam without cracking. For that, your kids can keep them as toys, like mini figures and of course Easter Eggs. This polymer clay can be a great activity at home for you and your children to have fun with. I had some great times with kid making this DIY Easter Eggs From Polymer Clay.

The polymer clay is easy to work with, you can make any form with it. Your kids would love it, they can go super creative with it. The best things is that the clay itself has already colorful and you can make your own color by combining your desired colors together. So it’s perfect to make Easter Eggs out of this squishy polymer clay. You can even make them into some key chains besides squishy toys.

Picture104

The Great Things About Polymer Clay

There are many things I like from this polymer clay, and those things are:

  1. The texture is elastic, moister and not easily disintegrated.
  2. Polymer clay is not messy to play with due to its texture.
  3. Once it’s harden enough, it will turn into squishy.
  4. You can keep your making as a toy because of the squishy-like texture and after days it will hard like a board foam.
  5. It doesn’t crack when it dries.
  6. The colors selections are soft and vibrant altogether and you can mix two or more colors to get a desired color.
  7. You can draw on the hardened polymer clay.

In this case, after I make the colorful eggs, I can decorate them with color pen. Isn’t that fun for kids? It is even fun for me!

Things To Prepared

You would only need to prepare two things to make this Easter kids activity of DIY Easter and those are:

  • Polymer clay in many colors
  • Sakura White Gelly Roll 0.5

Picture101

How To Make

If you have a pair of great hands to form things, then you would do fantastic on making these polymer clay Easter eggs. How to make these colorful Easter eggs?

  1. Take your favorite color clay as much as you want the size of the egg to be.
  2. Make a ball first until you got a smooth surface of the clay and then form an egg shape and place it in standing position. Let it dry. To get a great result, leave it dry a half day.
  3. Decorate the polymer clay eggs with gel pen in white colors (or other colors you favor) and paint it to be Easter eggs.
  4. Some you may want to decorate it with just colorful clay as if you are decorating a cake by using fondant.

Picture102

Trust me, it’s fun! So, not just your kids would have major excitement doing these Easter kids craft of polymer clay Easter Eggs, but you would also enjoy it. You can make small Easter Eggs, colorful Easter Eggs, monochrome Easter Eggs, big Easter Eggs, painted Easter Eggs or anything creative Easter Eggs you can think of by using this polymer clay. Happy trying, also bring along your children and have fun with it on coming Easter!

For more of my future Easter and Spring posts, please follow me! And if you wanted to add my creations to your Pinterest boards, please follow me on Pinterest! Also find me on Instagram and Twitter!

Pinterest-iconImage result for instagram buttonRelated image

Picture103

For creative fellow bloggers, don’t forget to join “You’re The Star” Blog Hop ! Link your inspiring posts every Monday and get a change to be featured! I’m one of the co-host of the blog hop for Creative Week and will choose the creative posts to be featured on Creative Features week. Please come and join the blog hop and I would love to see you there! Join and share the news!

See you!

Hop Hop and still be creative!

Mel

Easy DIY Easter Bunny Bloom Sign

Easter is super close now, some preparations for home decor may be impossible for you to make by yourself. But I may have an easy diy idea for Easter decoration; yes, an Easy DIY Easter Bunny Bloom Sign. It’s a simple colorful sign which fits for blooming – spring and Easter – bunny.

Picture21

Here we go with the things that you need to prepare for doing this Easy DIY Easter Bunny Bloom Sign :

  • Ribbon rose
  • Blue, green, red, yellow, white, purple (blue and red mixed) acrylic paint
  • Paint brush
  • Glue
  • Balsa wood
  • Cotton rope for hanger
  • Drawing pen

Picture19

Let’s go through the easy steps to DIY Easter Bunny Bloom Sign :

  1. Cut thin balsa wood in rectangle shape to used as the sign board.
  2. Mixed the acrylic colors of blue, green, yellow, red, purple with white to get pastel colors.
  3. Paint the balsa wood in stripes with different colors and nevermind the width of each color painted. Let it dry. Actually I used the remained colorful acrylic paint that I have used for my Shabby Flowers Hand Painting Wall Art. I just couldn’t waste the remaining paints, so I just painted it on the balsa wood and hope to get an idea of what to do with it and later the idea was this bunny sign.
  4. Draw a sketch of a hoping bunny. Paint the hoping bunny silhouette in white paint. Let it dry.
  5. Write the word “Bloom” on the sign board with drawing pen.
  6. Punch a hole on each side of the top side bunny bloom sign and tie it with cotton rope which serves as a hanger. Finished!

Picture20

It’s easy and fast diy, a little bit of drawing skill maybe. The Easter Bunny Bloom Sign can be a great addition to your diy Easter home decor inspiration and would do wonderful for spring decor too.

If you wanted to see more Easter DIYs / crafts ideas for coming Easter inspirations; you can check out my DIY Black & White Monogram Easter EggsEaster Kids Craft Tissue Roll Bunnies, How To Make Bunny Ears Headband From Tissue Roll, free worksheet Easter Themed Crossword PuzzleDIY eggshell Easter Card and Easy and Cheap DIY Easter Decoration From Plastic Surprise Eggs. To complete your Easter decor and preparation, check out HenMel Design‘s Easter collection of Pllows, Tote Bags and T Shirts. For more future posts, follow me! And if you wanted to add my creations to your Pinterest board, please follow me on Pinterest! Also find me on Instagram!

Pinterest-icon

Image result for instagram button

Picture22

See you again!

Blooming creativity!

Mel

DIY Black & White Monogram Easter Eggs

So many ideas of presenting Easter eggs for decorations. My idea was to make something more classic, mature and personal for Easter home decoration. Here are the DIY Easter eggs in black and white monogram. You can draw initials of your family members and painted in black and white. I made it all with hand-drawings, but you can always alternate it with stickers or stamping, etc.

A few things to prepare for DIY Black & White Monogram Easter Eggs :

  • Plastic eggs
  • White spray paint
  • Drawing pen – black
  • Black marker
  • Grey marker
  • Pencil

Picture8

Let’s see the steps to DIY Black & White Monogram Easter Eggs:

  1. Spray paint the cleaned eggs with white. Try to maintain a distance while spraying and don’t spray at one spot for too long, but spray in a glance all area, let it dry and repeat it until entire surface is covered evenly. Be patience to get best result. I used sewing pin as something to hold and stick it on the egg’s bottom so I can spray the entire surface without touching the egg.
  2. Sketch the pattern with the monogram you desired with pencil on the painted egg
  3. Enhance the monogram and the pattern on the easter eggs with drawing pen, black marker and grey marker. Let it dry and do it carefully.

Picture9

Another idea to present your Easter eggs for your diy home decorations on coming holiday; A black and white with personal monogram as your Easter eggs. This black and white Easter eggs are classic and have more mature look. And the best thing is that you can add your family member’s monogram on each egg.

If you wanted to see more Easter DIYs / crafts ideas for coming Easter inspirations; you can check out Easter Kids Craft Tissue Roll Bunnies, How To Make Bunny Ears Headband From Tissue Roll, free worksheet Easter Themed Crossword PuzzleDIY eggshell Easter Card and Easy and Cheap DIY Easter Decoration From Plastic Surprise Eggs. For more future posts, follow me! And if you wanted to add my creations to your Pinterest board, please follow me on Pinterest! Also find me on Instagram!

Picture10

Pinterest-icon

Image result for instagram button

See you again!

Make creativity!

Mel


I entered challenges:

  1. Country View Challenges – Easter
  2. Love To Craft – AG
  3. A Bit More Time To Craft – AG


How To Make Bunny Ears Headband From Tissue Roll

How To Make Bunny Ears Headband From Tissue Roll


You must be thinking, how a tissue roll can turn into a bunny ears headband. Well, it can, use a tall tissue roll then you are good to go. It’s so easy and fast craft, not much to prepared. So, are you interested to know how to make the bunny ears headband from tissue roll? Let’s get started!

Picture4

Things that you need to prepare for this easy Bunny Ears Headband Tissue Roll :

  • Long Tissue rolls
  • White poster paint
  • Paint brush
  • Flower ribbon ornaments
  • Wrapping paper in flowery pattern
  • Glue
  • Elastic band (you can alternate it with ribbon or plain headband)

Picture5

How To Make Bunny Ears Headband From Tissue Roll? Let’s see the easy steps:

  1. Sketch the bunny ears on the long tissue rolls.
  2. Cut both bunny ears shape off the roll.
  3. Press the bunny ears with heavy book to get a good wide shape to the front.
  4. Paint white on the outer side of the bunny ears. Let it dry.
  5. Glue the flowery pattern paper on the inner side.
  6. Hot glue the elastic band to the bunny ears. Leave it dry.
  7. Decorate the bunny ears headband with flower ribbon ornaments.
  8. Finished! You can decorate it as you wish or as how your kids would love. It’s a blank canvas!

Picture7

So easy, cheap and fun to do. Great upcycling tissue roll project too! Your kids would love the bunny ears headband and you can spent fun time together decorating it.

If you wanted to see my other Easter upcyling tissue roll project, you can check out Easter Kids Craft Tissue Roll Bunnies And more Easter DIYs / crafts ideas you might like to see from my older posts; free worksheet Easter Themed Crossword PuzzleDIY eggshell Easter Card and Easy and Cheap DIY Easter Decoration From Plastic Surprise Eggs. For more future posts, so follow me! And if you wanted to add my creations to your Pinterest board, please follow me on Pinterest! Also find me on Instagram!

Pinterest-icon

Image result for instagram button

Picture6


See you again!

Make creativity!

Mel


I entered challenges:

  1. Country View Challenges – Easter
  2. Love To Craft – AG
  3. A Bit More Time To Craft – AG


Fun Kids Learning Activity With Easter Themed Crossword Puzzle

Fun Kids Learning Activity With Easter Themed Crossword Puzzle


To celebrate Easter, not just decorations and treats that will cheer up our kids, but also Easter related activities will brighten their day. Regarding that, I was introduced to Education.com where there are tons of fun kids learning activities with themes to be found. And the best part is I have a fun Easter Themed Crossword Puzzle to share with you all; completed with the answers.

Picture104

This Crossword Puzzle is not just enrich kid’s vocabulary and learn the meaning of each word, but also have fun with anything surrounding Easter. Not to mention the cute Easter Theme that would be enticing for kids to instantly grab the Crossword Puzzle and have fun learning words with it.

I have prepared the Easter Themed Crossword Puzzle in pdf file and the answer sheet too, further below.

crossword_easter (pdf)

Picture103

Pinterest-icon

Doing fun learning activity together with your kids would also help you create more bound and able to monitor your kids development. And themed worksheet is great tool to introduce your kids to a little art. Like this Easter Themed Crossword Puzzle which shows some colored drawings of a happy Easter bunny and cute little chicken with a pretty basket of Easter eggs and treats.

Furthermore, if you have already planned an Easter card making with your kids, try to include this Easter Themed Crossword Puzzle as your Easter fun kids activity list this year. So, not just fun creativity session, but also fun learning session is included to your Easter activity list.

crossword_easter_answers (pdf)

Picture105

To have more choices of fun learning activities, you can look for different worksheet which favored by your kids. Besides, Easter is just around the corner, and kids will love celebrating with this beginner-reader matching activity! For more resources for young readers, check out the full collection at Education.com. Have fun!


See you with more Easter & Spring creations!

Have fun a creativity!

Mel

Easter Kids Craft Tissue Roll Bunnies

Easter Kids Craft Tissue Roll Bunnies


Easter is coming next month, inspirations and ideas are the important things right now to prepare memorable Easter, especially for the kids. For that, I have an idea to share with you all, easy, cheap and fun Easter kids craft. Let’s make Easter Kids Craft Tissue Roll Bunnies!

Picture96

A few things that you need to prepare for this easy Easter Kids Craft Tissue Roll Bunnies :

  • Tissue rolls
  • Green, blue, red acrylic paint mixed with white ( to get the pastel look of light blue, green and pink)
  • Paint brush
  • Drawing pen
  • Wrapping paper scraps
  • Glue

Picture94

Let’s go through the easy steps to Easter Kids Craft Tissue Roll Bunnies :

  1. Sketch the bunny ears on the tissue rolls, front and back of the roll.
  2. Cut the ears shape both front and back of the roll.
  3. Paint each bunny roll with light blue, green, and pink. Let it dry.
  4. Draw the eyes, nose, mouth and feet of the bunnies. Paint the nose pink.
  5. Cut some wrapping paper scraps into the inner bunny’s ear and glue it to each bunny’s ear.
  6. Finished! You can add eggs, treats, flowers, anything relates to Easter or anything your kids would love to add.

Picture95

Aren’t those bunnies cute? Easy, quick, cheap and fun to do with your kids, it’s a perfect craft to make on Easter. I’m sure you have lots of tissue rolls at home, so it wouldn’t be difficult to do this Easter craft. I have some more Easter DIYs / crafts ideas you might like to see from my older posts; DIY eggshell Easter Card and Easy and Cheap DIY Easter Decoration From Plastic Surprise Eggs; and more on future posts, so follow me! And if you wanted to add my creations to your Pinterest board, please click this “P” button bellow to visit me on my Pinterest!

Pinterest-icon

Picture97

See you again!

Hello spring  creativity!

Mel

Picture98

I entered some challenges for my Easter Kids Craft Tissue Roll Bunnies to:

  1. International Art & Soul – Green and 2 Other Colours
  2. More Mixed Media Challenge – “Anything Goes” + optional Green
  3. Crafty Creations – Anything Goes
  4. Lil Patch Of Crafty Friends – Anything Goes