DIY Fall For You – Gold Love Card

DIY Fall For You – Gold Love Card

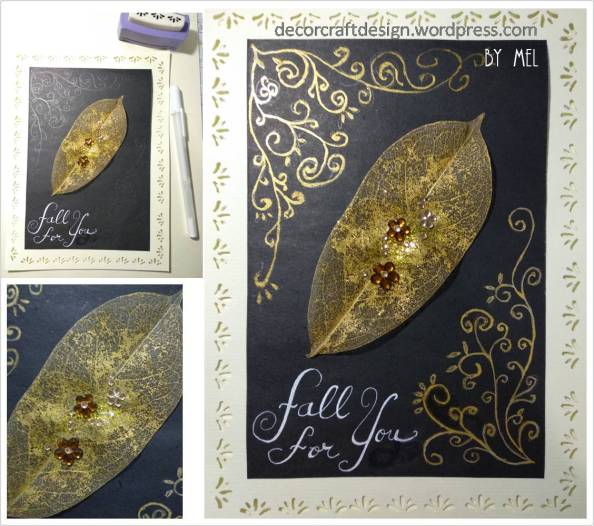
I really wanted to make a diy card out of the gold decorative skeleton leaves I made. In my mind, I wanted to have a fall touch, but the twist is actually a love card. So it is more like a love card on a fall season.

To have the card in fall look, I have already had the skeleton leaves that I had painted and decorated in gold paint and gold bling. Then for the card, I decorated it with some gold paint and had a sentiment “Fall for you”. I used the main background with black color to have a contrast with the gold, especially gold skeleton leave, so that the skeleton details can show off its beauty in gold.

Picture26

Well, I wanted to share all the materials I used on this diy gold love card, which are:

  • Gold decorative skeleton leaf
  • Gold paint
  • Paint Brush
  • White Gel Pen
  • Concorde paper
  • Black paper
  • Ribbon
  • Puncher
  • Glue

Picture27

This gold love card is made for my love, because “I fall for you” everyday. I hope all of you to get inspired, to still fall for love along this fall season and make a love card to your loved ones too.

See you all!

Fall for the love of creativity… .

Mel

I entered challenges below for this diy fall for you card :

  1. Make My Monday – Fall / Autumn Colours
  2. The Sisterhood of Crafters – Fall is in the air
  3. A Vintage Journey – Back To Nature
  4. Get Creative – Lots of Bling & Sparkle
  5. Sparkles Monthly Challenge – Dies or Punches
  6. Cute Card Thursday – Monochrome
  7. Simon Says Stamp Monday – Monochrome
  8. Monochrome Magic – Monochrome Twist of Add a Bow
  9. Craft Dee Bowz – Anything Goes and include a HANDMADE BOW
  10. The Corrosive Challenge – Anything goes
  11. Crafty Sentiments – Anything goes

DIY Gold Decorative Skeleton Leaves

DIY Gold Decorative Skeleton Leaves

On my previous post I have given a simple tutorial on how to make diy skeleton leaves without chemical. Some are perfectly done but I also got ones with defects. Small part of the skin was dried before it reach decaying process, so the skin still intact to the skeleton, can not be removed. But no need to straight away throw them as they can be turned into something useful and pretty. On this post I’m going to show you how to use those defected skeleton leaves into decorative leaves.

Since we all need lots of inspiration for the autumn season decorations, I made the leaves art in shimmering gold. Fancy! So, need to prepare :

  • Skeleton leaves ( I used the defected ones).
  • Gold paint
  • Paint brush
  • Gold glitter
  • Red glitter
  • Bling stickers
  • Glue
  • Black Acrylic paint

Picture21

How to make diy decorative leaves?

  1. Paint the leaves with gold paint. I don’t dye it because I don’t want to waste too much of my gold paint. So I painted it. Leave it dry.
  2. Put the painted leaves on the pages of a book and press it for couple of hours until it firmed.
  3. Apply some glue and then pour some gold glitter on the defected area of the skeleton leaf. Decorate it as you desired, don’t just cover the defected area but also give some artsy touch to it. Then, leave it dry.
  4. You can play with more decoration, bling stickers, glitters, paint etc.
  5. Now you got yourself some decorative leaves from defected leaves. From here, you can make use of the decorative skeleton leaves into lots of other purposes.

Picture22

I got 5 gold skeleton leaves with 5 different look. The black and gold, the red and gold, the gold and flowery bling, the plain gold and the last one is the bling gold. the plain gold was the one with the most minor defect, so after I painted it with gold, the defect did not show.

Pinterest-icon

Picture23

I wanted to pick one of the decorative leaf as my journal mark, but I haven’t decided yet. But if I have chosen one, I will have it pressed with plastic sheet and give some ribbon or something. In that way, I can preserve the decorative leaf as a firm journal mark.

Picture25

The rest of the gold decorative I kept it in case I need some decorative leaves to decor other projects, especially during this autumn season.

Well, I hope my diy gold decorative skeleton leaves bring some inspiration to your diy fall decorations or gifts.

Picture24


See you all again!

Be gold in creativity!

Mel

I entered challenges of my DIY Gold Decorative Skeleton Leaves on:

  1. Make My Monday – Autumn / Fall Colours
  2. Crafty Sentiments – Fall Colors
  3. International Art & Soul – Nature
  4. A Bit More Time To Craft – Anything Goes
  5. Altered Eclectics – Anything Goes
  6. Everybody Art Challenge – Anything Goes


DIY Fall Leaves Painted Bottles Set In White And Gold

DIY Fall Leaves Painted Bottles Set In White And Gold

I have been keeping bunch of bottles from drinks, oil and etc. Wished that I could do something nice to them. Until now I got the mood to paint small bottles that I got from vitamin C drink. These are small bottles, so I made it into set of three painted bottles. Since now is time to welcome the fall season, I thought I could give some inspiring diy fall painted bottles that can be used as for flower vases or just decorations.

When I think of fall, I mostly think of leaves, all the falling leaves with different shapes and colors. And when you see it from the distance, you can see shimmering gold everywhere and it’s so beautiful. That is why I chose to paint the bottles in white and gold with three different shapes of leaves.

What do you need to do this fall leaves painted bottles set and how to make it in white and gold? Well, you need :

  • Three small glass bottles (choose used bottles, save money!)
  • White spray paint
  • Gold Acrylic paint
  • Paint Brush
  • Organic rope

Picture14

I was starting with:

  1. Clean the used bottles and dry it thoroughly.
  2. Spray paint the three bottles with white paint. Let it dry.
  3. Sketch each bottle with the desired leaf shape by using pencil.
  4. Paint the leaves carefully in three bottles with gold acrylic paint. Let it dry.
  5. The bottles that I used has texture around the bottom of it, so painted the texture too in gold acrylic to make it pop and add more character. Let it dry.
  6. Tie each bottle with organic rope to give an earthy feeling of fall season.
  7. Your set of fall leaves painted bottles in white and gold is ready!
  8. Get some yellow or orange chrysantemum or gerbera or any other single flower that you like and put one to each bottle and you can use the set as fall centerpiece. I was looking for yellow or orange gerbera but I can only found chrysantemum, so that’s it.

Picture15

Pinterest-icon

It is so simple, does not take too much work and cheap. It’s a great diy of short time preparation for fall decorations. It’s great for fall centerpiece with sophisticated white and gold if you have dinner party in this upcoming autumn season.

Picture16


See you all!

Set off to creativity season!

Mel


I entered challenges for this diy fall leaves painted bottles to:

  1. Stinkin’ Inkers – Leaves are falling
  2. That’s Crafty – Forever autumn challenge
  3. International Art And Soul – Use a non-craft item on your project / Recycle
  4. Shopping Our Stash – Upcycle
  5. A Vintage Journey – Back To Nature
  6. Dare 2 B Artzy – Your favorite color
  7. Colour Crazy Challenge – Anything goes
  8. Rhedds Creative Spirit – Anything goes
  9. Altered Eclectics – September anything goes
  10. Crafty Creations – Anything goes


Handmade Pink Orchid And Gold Birthday Card

Handmade Pink Orchid And Gold Birthday Card

My mom’s birthday is coming soon, therefore so I already prepared myself with handmade birthday card for her. Last time I made a card for her was on mother’s day with hydrangea card. Besides hydrangea as her favorite, orchid is also her favorite flower.

Before this project, I have made an artwork paper of pink orchid with the shade of gold. I used that image to make this birthday card. Let me show you the list of things that I had for the handmade card.

  1. Pink orchid artwork paper
  2. Pink satin ribbon
  3. White lace
  4. Gold stone stickers as a charm
  5. Light yellow Concorde paper
  6. Upcycle card paper
  7. Glue
  8. Scissors
  9. Drawing pen

Picture37

I made this handmade card in a classic look with two dominant colors, which are pink and gold. And this orchid birthday card is simple because i wanted the pink orchid to be the star and take stage.

Picture38

I hope you guys enjoy my handmade gold birthday card I made with pink orchid hand drawing. Maybe it will inspire you to make your own handmade card with hand drawing or other project with orchid as an object.

Picture39

I entered my handmade pink gold birthday card to :

  1. Cardz 4 Galz – 
  2. Make My Monday – Oriental
  3. Card Mania – Anniversary
  4. Let’s Create – ANYTHING GOES + option LOTS OF LAYERS
  5. Simon Says Stamp Monday – Tape it up
  6. Craftaholics R Us – Yellow
  7. Cute Card – Charms
  8. Craft Dee Bowz – Anything Goes and include a HANDMADE BOW
  9. Tuesday Throwdown – Anything goes
  10. Crafty Friends – Anything goes
  11. Aurora Wings – Anything goes
  12. Dare To Be Artzy – Anything goes
  13. A Bit More Time To Craft – Anything goes
  14. Crafty Creations – Anything goes
  15. The Corrosive Challenge – Anything goes August
  16. 613 Avenue Create – Anything goes

Picture40


See you!

Make creative handmade!

Mel