DIY Spring Sign For Wall Decor

I had kept a defective wooden sign I bought in sale at Daiso for quite a time. I was planning to use it as a sign, but give it a totally different look. Since the old sign has already have a burlap rope as the hanger, it became easier for me to only transform the look. Since the Spring is still linger, I made a DIY Spring Sign that would look great for Wall Decor or just as a mantel decor.

I painted a bouquet of aster tied in a simple rope. I love to see some aster hanging on my wall; it calms me. It looks so serene with its lavender color, no wonder aster means patience; but some others said it is a flower of love and wisdom. It’s a simple humble looking flower with its own beauty. And it’s a symbol flower of September. However, I painted the aster with acrylic paint. Let’s find out how I make this simple DIY with a little painting job involved.

Picture15

Things To Prepare

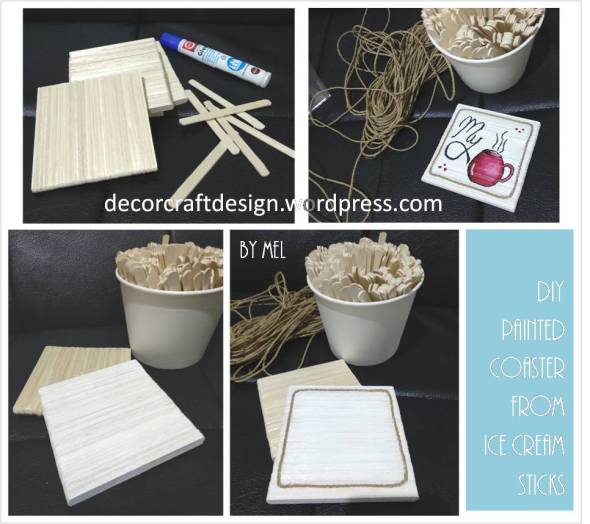
It’s a make over project actually, because I turned a flawed sign into a new painted Spring sign. And here is the list of the supplies I used for this Spring sign DIY.

  •  Defective wooden sign (an old sign would do too)
  • White spray paint
  • Acrylic paints (white, yellow, blue, green and red)
  • Black marker

Picture13

How To Make

It’s mostly a painting job and you can replace the painting part by doing a decoupage. Anyway, let me show you the steps I made when I was making this DIY Spring Sign.

  1. I spray painted the half-price sign in white and wait for it to dry.
  2. Mix the paint to get the desired colors.
  3. I started to paint the petals of each aster blossom first and then added the yellow stamen.
  4. I painted the flower stalks, leaves and finish it off with a simple red string tied in bow.
  5. And last but not least, write the word “Spring” on the bottom of the aster black marker. Finished!

Picture14

It’s an easy spring sign to make for those who familiar with painting works. It’s just a simple painting of aster to mark a very calm spring. So, I hope you enjoy my DIY Spring Sign For Wall Decor and maybe inspired to make your own version. Have a fun creative spring sign project to do!

For more of my future Spring posts, please follow me! And if you wanted to add my creations to your Pinterest boards, please follow me on Pinterest! Also find me on Instagram and Twitter!

Pinterest-iconImage result for instagram buttonRelated image

Picture16

For creative fellow bloggers, don’t forget to join “You’re The Star” Blog Hop ! Link your inspiring posts every Monday and get a change to be featured! I’m one of the co-host of the blog hop for Creative Week and will choose the creative posts to be featured on Creative Features week. Please come and join the blog hop and I would love to see you there! Join and share the news!

See you!

Be safe and creative!

Mel

Top Ten Post Of 2019

Looking back to 2019, many hard works and creative process that had been shared to my lovely readers. Some posts do great and some posts get more views and wonderful enthusiasm by sharing your creativity and ideas. Some of you may just know about my blog recently, therefor I recap my top ten posts of 2019 for you to check out. You can click on each list to view the post.

Picture6

In order to share my top ten posts of 2019, here I made a list of the Top Ten Posts according to most view posts along 2019. So, some recent posts may not appeared as it was not enough time to gain lots of views. Anyway, here are my Top Ten Posts of 2019 in top viewed order:

1.  How To Make Easy Skeleton Leaves Without Chemical

This is actually my post from 2018 but surprisingly it’s a number one top post on 2019. I shared on how to make skeleton leaves without using any chemical. A natural way to do. You can check out my tutorial if you’re interested to do, just click the post’s title.

picture11.jpg

 2. DIY Spring Lace Tin Can Mug Flower Vase

This Spring Lace Tin Can Mug Flower Vase  is one of my favorite DIY I’ve made back at Spring 2019. I was re-purposing a tin can. It’s an easy DIY Spring, so please check my post on how to make it. It would make a great Spring DIY list addition for you to do this year.

Picture84

3. Lighthouse In Watercolor Hand Painting

I was starting to use watercolor to paint last year, and I got smitten with it and made several watercolor paintings. A lighthouse in watercolor which I hand painted is one of my personal favorite watercolor painting. I just love the red and white lighthouse by the seashore.

Picture113

4. Fall Leaf In Watercolor Shades – Quote Painting

Still exploring with watercolor, I painted a fall leaf in watercolor shades of fall colors and added a little quote. A quote painting would do best as a printed cards, or printed framed decoration. On my post you can see the transformation of steps I’ve made to paint the fall leaf.

Picture62

5. Free Printable Thanksgiving Word Search And Coloring For Kids

Thanksgiving is family time; kids, grand kids, nieces, nephews, all are gathering and you just need to give them some quality time to spent in a calm way. And my post of giving away for free a Thanksgiving printable of word search and coloring, would be a perfect 2 in 1 kids activity page. Want to keep it for this year Thanksgiving? Please download at this post by clicking this 5th top post.

Picture32

6. DIY Rustic Vase For Spring Decor

Another spring DIY of a rustic vase for spring decor. This is also a re-purposing project which is super easy. I did a little drawing but you can always use stickers or stencils. It suits perfectly for farmhouse decor during spring blooming season. And as usual, I shared the tutorial on the post.

Picture86

7. Free Printable Of Lavender To Do List

The seventh top post is my Free Printable of Lavender To Do List. A to do list with lavender painting in watercolor as decoration to sweeten your mood in planning your daily, weekly or even monthly things to do. Please feel free to download the lavender printable on the post. And there are more lavender printable of memo, journal for free download.

Picture67

8. How To Make Your Home Naturally Smell Good With A Can Of Coffee Beans

This post will give you idea of how to make your home naturally smell good and at the same time make your home look pretty with a can of coffee beans. A functional decoration made by yourself from un-used can. Interested to do your own? Check out the tutorial on the post.

Picture22

9. Roses Of Love Painting

I’m so glad that my readers favors this Roses Of Love Painting and made it the 9th top post of 2019. It was an acrylic painting on a canvas I’ve painted to celebrate Valentine’s Day. There are pictures of the painting process on the post for you to see.

picture14

10. Easter Kids Craft Tissue Roll Bunnies

The last top post of 2019 is the Easter Kids Craft of Tissue Roll Bunnies. It was fun making the bunnies in many colors and it’s super easy and quick to do. Your kids would have a great time helping you with the craft. You should check my post to see how I made it so you can bring along your kids, grand kids, or pupils to create it on this year Easter.

Picture96

That’s all my Top Ten Posts Of 2019, some of my shared creativity for your inspirations in 2020. For addition, the 11th and 12th top post of 2019 is Shabby Chic Lace Tin Can Vase For Easy DIY Spring Bridal Shower and Happy Mother’s Day Flowers In Watercolor Card. Hope you enjoy the top ten posts and eager to try it yourself. Please tell me which DIY that you interested to do for this year’s project on the comment below. Happy making creativity in this new year of 2020!

For more of my future New Year posts, please follow me! And if you wanted to add my creations to your Pinterest boards, please follow me on Pinterest! Also find me on Instagram and Twitter!

Pinterest-iconImage result for instagram buttonRelated image

For creative fellow bloggers, don’t forget to join “You’re The Star” Blog Hop ! Link your inspiring posts every Monday and get a change to be featured! I’m one of the co-host of the blog hop for Creative Week and will choose the creative posts to be featured on Creative Features week. Please come and join the blog hop and I would love to see you there! Join and share the news!

See you!

Enjoy the top ten creative creation!

Mel

Real Neat Blog Award In Blue and Gold

This is my second Real Neat Blog Award, and it’s presented by the award maker, Dear Kitty, Some Blog. What an honor! Thank you so much! Please visit the blog, it’s full of global knowledge. And to appreciate it, I painted an abstract logo for The Real Neat Blog Award of a little coral look in blue and gold colors.

The rules of this award are:

  • Put the award logo on your blog.
  • Answer the 7 questions asked by the person who nominated you.
  • Thank the person who nominated you and add a link to their blog.
  • Nominate any number of people linking to their blogs and let them know you nominated them by commenting on their blogs.
  • Come up with 7 questions for the people you nominated.

Picture58

My seven answers to the seven questions are:

1. Who is your favourite visual artist? Don’t have

2. Which is your favourite bird species? Love bird

3. Which is your favourite mammal species? Dog

4. What is your favourite insect? Butterfly

5. What is your favourite plant? Hydrangeas, Roses, Orchids, I can go on and on…

6. Where do most visits to your blog come from? My dear followers

7. If you would be invited to make a space journey, then to which solar system planet would you like to go? To the one that has already been a living proof

My seven Questions are:

  1. What is your definition of “neat”?
  2. Dogs or cats?
  3. Less or more?
  4. Loud or calm?
  5. On stage or backstage?
  6. Truth or dare?
  7. Sour or bitter?

My nominees are:

  1. Tilly – 40′ Fore Forty
  2. Suzi – My Colourful Life
  3. Tatterhood

Congratulations to the nominees and thanks again to Dear Kitty! Enjoy!

For more of my future Coastal Summer theme and welcoming Fall season posts, please follow me! And if you wanted to add my creations to your Pinterest boards, please follow me on Pinterest! Also find me on Instagram and Twitter!

Pinterest-iconImage result for instagram buttonRelated image

And for creative fellow bloggers, don’t forget to join “You’re The Star” Blog Hop ! Link your inspiring posts every Monday and get a change to be featured! Starting June 2019, I will be co-hosting the blog hop and would love to see you there! Join and share the news!

See you all!

Be creatively neat!

Mel

Creativity Quote With Whale Painting

This time I’ve painted a whale in a watercolor, a cute blue whale. I painted it in cartoon style, which I think looks so adorable. I also added a creativity quote “Creativity blows your mind”. The word “blows” relates to the whale’s blowhole, where they blow out all the water that they inhaled before together with the air. And creativity can really blows your mind. Anything seems possible with creativity, no boundaries, mesmerizing, and mind blowing.

Picture44

Creativity is amazing and so does a whale. A very big mammal that feed, mate, give birth, suckle and raise their young at ocean. And the word “whale” comes from the Old English hwæl, from Proto-Germanic hwalaz, from Proto Indo European (s)kwal-o-, meaning “large sea fish”. Whales have been through some evolving process, from land-living mammals. For instance, whales must breathe air regularly, though they able to remain descend under water for long periods of time and even some whale species can stay below the sea surface for 90 minutes. Some have blowholes, some only have one blowhole (modified nostrils) which you can find it on the top of their heads, the blowhole is where the air is taken in and expelled. Pretty amazing right? So a whale is worth to be at a quote painting of creativity.

Picture45

I made this quote painting in watercolor as my painting hobby and words playing. A painting and some words play can make an interesting quote painting which leads to printable as decoration or a cover for your agenda or anything you would like to put at. The words and the painting can reminds you and / or at the same time would inspire you.

For more of my future Coastal Summer theme posts, please follow me! And if you wanted to add my creations to your Pinterest boards, please follow me on Pinterest! Also find me on Instagram and Twitter!

Picture46

Pinterest-iconImage result for instagram buttonRelated image

And for creative fellow bloggers, don’t forget to join “You’re The Star” Blog Hop ! Link your inspiring posts every Monday and get a change to be featured! Starting June 2019, I will be co-hosting the blog hop and would love to see you there! Join and share the news!

See you!

Creativity blows your mind!

Mel

Floor Plan & Outdoor Shower Of The Beach Home Design In Watercolor

Last week I’ve shared my beach home design which divided into two posts; first was the beach house exterior and the second post was the bedroom view of the beach home. Now on this post I’ve managed finished the floor plan, section and outdoor shower of the beach home in watercolor paint.

Picture35

Let me refresh you with the beach house dimension. This is a tiny beach home with the size of 2.5 m x 5 m (around 8.2 ft x 16.4 ft) which included front and rear patio. An attic serves as a bedroom and on the first floor, the beach house is loaded with a pantry, a toilet, a sitting room, little front patio and an outdoor shower which in the same area with the entrance staircase (rear patio).

I had the beach home outdoor shower and floor plan painted in watercolor. I used some drawing pens as the outline while brush pen and watercolor to paint the whole drawings.

Picture37

Now, after you go through my third post of the beach house design, I hope you get the whole picture of my beach home design which I presented in watercolor. The floor plan, the outdoor shower, the bedroom view and the exterior perspective should give you enough look of the best feature rooms of the beach house. Enjoy the beach!

For more of my future Coastal Summer theme posts, please follow me! And if you wanted to add my creations to your Pinterest boards, please follow me on Pinterest! Also find me on Instagram and Twitter!

Picture36

Pinterest-iconImage result for instagram buttonRelated image

And for creative fellow bloggers, don’t forget to join “You’re The Star” Blog Hop ! Link your inspiring posts every Monday and get a change to be featured! Starting June 2019, I will be co-hosting the blog hop and would love to see you there! Join and share the news!

See you!

Shower your hands with creativity!

Mel

Bedroom View Painting Of The Beach Home Design

I’ve designed a beach house which I have presented the exterior perspective on my previous post. Now on this post I’ve prepared  the beach home interior to show the bedroom view to a beach through the large opening. Imagining you were sitting on the bed looking through the horizon. So peaceful!

Picture30

This is a tiny beach home with size of 2.5 m x 5 m (around 8.2 ft x 16.4 ft) which included front and rear patio. An attic serves as a bedroom and on the first floor, the beach house is loaded with a pantry, a toilet, a sitting room, little front patio and an outdoor shower which in the same area with the entrance staircase (rear patio).

I had this bedroom interior view painted with watercolor. I used a little drawing pen and brush pen to give a quick finished touch. I will show you more of my beach house interior and floor plan on my next post. I hope you able to enjoy the view of the beach horizon through my painting of the beach home bedroom design.

Picture31

For more of my future Coastal Summer theme posts, please follow me! And if you wanted to add my creations to your Pinterest boards, please follow me on Pinterest! Also find me on Instagram and Twitter!

Pinterest-iconImage result for instagram buttonRelated image

And for creative fellow bloggers, don’t forget to join “You’re The Star” Blog Hop ! Link your inspiring posts every Monday and get a change to be featured! Starting June 2019, I will be co-hosting the blog hop and would love to see you there! Join and share the news!

See you soon!

Have a creative point of view!

Mel


Take A Coffee Break Quote Painting

Sometimes we work so hard trying to fulfill our targets until we forget to take care of ourselves, smiling, or simply enjoy a beautiful view. So, whatever you are doing right now, take a break and enjoy something you really love to do, maybe with a cup of tea or a cup of coffee. Relax and enjoy it until your cup is empty. Take a break, because even wave has a break.

I feel relax when I draw, it’s like a therapy for me. And when it’s finished, it gives me a good feeling and a smile. For me, painting or drawing is also a break from hectic routine, therefore, I have painted a cup of coffee for a break and a background view of some waves breaking by the beach. I painted it in watercolor with a quote “Take a break, even wave has a break”.

Picture19

It’s a mid-week, get your self energized to deal with the rest of the week, a coffee break should raise up your energy level. Hope you enjoy my quote painting and let your self take a break, sit down, make yourself a delicious coffee and enjoy whatever thing you feel therapeutic for you. Don’t be too hard on yourself! Have a nice break!

For more of my future Coastal Summer theme posts, please follow me! And if you wanted to add my creations to your Pinterest boards, please follow me on Pinterest! Also find me on Instagram and Twitter!

Pinterest-iconImage result for instagram buttonRelated image

Picture20

And for creative fellow bloggers, don’t forget to join “You’re The Star” Blog Hop ! Link your inspiring posts every Monday and get a change to be featured! Starting June 2019, I will be co-hosting the blog hop and would love to see you there! Join and share the news!


See you soon!

Take a break and think creatively!

Mel

Lighthouse in Watercolor Hand Panting

Lighthouse is always a fascinating building to see in every seaside. I love the shape, the red and the white colors. Matching with my Nautical Summer theme, I hand drew a Lighthouse by seaside which I hand painted it with watercolor.

lighthouse is a tower designed to serve as a navigational aid for maritime pilots at sea or on inland waterways by emitting light. Basically, lighthouse has two types: a lighthouse on a land and on the offshore. A land lighthouse is simply built to aid navigation more over the land than water. Usually constructed in flatland where a bright lantern could be visible for many miles for traveler who’s disorientated and lost.

Picture112

Lighthouses mostly mark dangerous coastlines, and were used widely. But due to high maintenance and increasing use of electronic navigational systems, slowly the number of operational lighthouses has declined. Many lighthouses are abandoned and deteriorated along with passing time. Afterwards, the lighthouse become more as preserved building.

I try to preserve it in a hand painted watercolor painting. The lighthouse on a sloping green by the calm sea. A serene look of tough lighthouse. I sketched it with pencil. I painted it with natural colors of brush pen. And for the watercolor, I used red, white, blue, ochre and green.

Picture111

A framed painting could be a great piece to decorate your home. Especially a piece you made, a conversation starter with your guests. Well, hope my Lighthouse in watercolor hand painting inspires you in anything, to paint, to have a vacation, to write a poem, anything that makes you think of seaside, beach, breezy summer, all the coastal beauty.

Picture113

For more future posts, please follow me! And if you wanted to add my creations to your Pinterest board, please follow me on Pinterest! Also find me on Instagram!

Pinterest-iconImage result for instagram button

And for creative fellow bloggers, don’t forget to join “You’re The Star” Blog Hop ! Link your inspiring posts every Monday and get a change to be featured! Starting June 2019, I will be co-hosting the blog hop and would love to see you there! Join and share the news!

Picture114

See you!

Let your creativity shines!

Mel

I played at Paint Party Friday.

I entered challenges:

  1. My Time To Craft – Watercolour
  2. Get Creative Challenge – Anything Goes/Opt Twist Favorite Color Combo
  3. A Bit More Time To Craft – AG
  4. Love To Craft – AG
  5. Colour Crazy – AG
  6. A Perfect Time To Craft – AG
  7. Craft Rocket Challenge – Summer

Autumn Painting Of Maple Tree

Autumn Painting Of Maple Tree

Inspired by maple trees with the red and gold colors of the autumn season, I painted a maple tree with the swirl of golden-yellow background. I think this painting is more like a modern abstract, if I’m not mistaken because I have never been in an art school. I just paint whatever comes in my mind.

Picture50

I love painting, but I need at least two whole days to finish a simple painting. And two whole days means I ask a lot from my daily routine 🙂 That’s why I don’t do a lot of painting even though there are many ideas and objects that have already taken lines in my mind. So, every time I have a time to paint and able to finish it, I’m very pleased!

Picture52

Actually I have been postponed this autumn painting of maple tree for a month. I was very busy and unable to paint something more complicated. So, this maple tree painting is quite simple and fast in its process.

This was the first time I used acrylic paint on a canvas. I found it a lot easier to use acrylic instead of oil paint because acrylic paint dries faster than oil paint. So, the painting process is a lot faster which was good for my busy days. Just for information, I used acrylic colors of Vermilion, Yellow Ochre, lemon yellow, gold, titanium white, crimson, burnt umber.

Picture53

I have now a need addition to my autumn decoration and painting collections. I hope all of you who drop by to peak and read my post enjoys this Autumn Painting Of Maple Tree. May you be inspired too by this golden-yellow and red maple tree painting  of autumn season spirit and create something in your own creations.

See you soon!

Creative Autumn Spirit!

Mel

Picture51

I entered below challenges for this Autumn Painting Of Maple Tree and play at Party Paint Friday :

  1. Craft Rocket – Autumn / Halloween
  2. Unicorn Challenge – Autumn / Halloween
  3. Brown Sugar Challenge – Celebrate Autumn
  4. A Vintage Journey – Autumn Splendor
  5. Dare 2 B Artzy – Fall
  6. Use Your Stuff – Mood Board (Autumn – Maple Tree)
  7. Dream Valley Challenges – Anything but a card
  8. Country View Challenge – Plantastic

How To Make DIY Painted Coaster From Ice Cream Sticks

This is not a usual treat of ice cream sticks. Why? Because I made those ice cream sticks into a wooden plate. From there, I have some great ideas for functional decorations to make. I love functional decorations instead of just plain decoration. More meaning! More functional items in our home is better, something pretty yet useful. So, first thing first. On this occasion, I will show you how to make diy painted coaster from ice cream sticks.

What do you need to make a painted coaster out of ice cream sticks?

  • Ice cream sticks
  • Glue (for wood)
  • Spray paint – white color
  • Acrylic paint – red, white, black color
  • Paint brush
  • Organic rope
  • UHU glue

Picture7

How to diy a painted coaster from ice cream sticks?

  1. Apply glue (for wood) evenly along the ice cream stick surface. Glue the ice cream sticks to each other one by one. Watch for the same length and width.
  2. Line them all up until it is square in dimension.
  3. Let it sit for a while until the glue dry and become a firm wooden panel.
  4. Spray or apply paint to all the surfaces of the ice cream sticks panel with white color. Let it dry.
  5. Take organic rope and arrange it gently but firmly around the coaster surface by creating an inner frame. Glue it with UHU. Let it dry.
  6. Paint the inner coaster with white acrylic paint to have more contrast. Let it dry.
  7. Paint the wording and the mug with black paint. Let it dry.
  8. Color the mug with red gradations and the help of white acrylic paint to get a 3D look on the mug. Let it dry.
  9. Fill out some blank space on above and below corners with 3 red dots each. let it dry.
  10. Your diy painted coaster from ice cream sticks is ready.

Picture8

You can be creative with the painting for the ice cream sticks coaster, the object, the colors or the wording. I chose the red color for great contrast. You can choose any theme according to your home color theme or party theme or simply your favorite color / object.

The ice sticks became a solid wood and made into a strong and thick drink coaster. It can also used for bowl of hot soup coaster. It’s easy, cheap and fun to do. So, happy trying!

Pinterest-icon

Picture9

I entered my diy painted coaster from ice cream sticks to following challenges:

Please follow me to find more future posts about using ice cream sticks for functional home decorations and more other creative handmade.

Ice Stick to creativity!

See you very soon!

Mel