DIY Painted Upcycled Mug

Spring is coming soon and our March Challenge Theme is Floral. When I heard the word floral, I couldn’t help myself to paint some flowers. Then, I saw a DIY Painted Mug at Pinterest, it was inspiring me to make a DIY Painted Upcycled Mug. I think it’s a perfect decoration for Spring by painting some floral pattern to an old mug that I can use for multi-purpose holder. And for my floral pattern, I painted pink tulips. But before I share with you steps on how I painted the mug, let me explain a bit about The Sustainable Pinterest Challenge.

The Pinterest Challenge has had a bit of a reboot for 2022 and is now the Sustainable Pinterest Challenge. Each month I join a group of creative bloggers and we select a pin or two to we feel inspired by and give it a go. Starting in January 2022 the Pinterest Challenge has a sustainable, eco friendly twist to it. All the projects shared will have something about them that involves recycling, upcycling, a general ethos of reducing waste and using what we have. It’s not about beating ourselves with a stick, it’s just about giving thought to how we can make small changes in our lives just a little more sustainable and reduce our impact on the environment.

Last month’s theme challenge was “From The Kitchen” and I made an Upcycled Valentine Wall Decoration. For this month theme “Floral” and of course a sustainable as a base to any of our challenge projects, I make used of my old mug and turned it into a multipurpose holder. Can even be used as a vase. I painted some pink tulips in vertical way along bottom of the mug. I think it’s a great composition. For the colors, I prefers a vintage look, that’s why I painted pink tulips against blue background. As the picture shown, I filled in the tulip painted mug with ribbon roses that I like to make in my spare time.

Things To Prepare

For this floral repurposing project, any old mug will do. And for the flowers, you can paint any type of a single flower like a tulip. Anyway, let’s see what I use to make this PaintedUpcycled Mug in tulips:

  • Red acrylic paint
  • Green acryic paint
  • White acrylic paint
  • Blue spray paint
  • An old mug

How To Make

It’s a painting works indeed, but for those who has trouble with painting, you can use stickers of tulips to replace my tulip painting on the mug. Now, gather all the supplies which I’ve mentioned above and follow these easy steps on how to make DIY Painted Upcycled Mug :

1 . Take the old mug and clean it. Let it dry. Then you can paint it with blue spray paint. Leave it to dry.

2. I painted pink tulips so I use red and white acrylic paint to make several shades of pink and also mix the green with white to get a beautiful green gradation for the stem and leaves.

3 .Paint the tulip buds first with the light pink and followed with white and darker pink for shading.

4. Paint the stem which followed by the leaves in darker green. And you are finished with the tulip floral mug!

Now let’s take a look at what the other Sustainable Pinterest Challenge participants have made for their “Floral” challenge.

You are invited to the Inlinkz link party!

Click here to enter


Julie | Sum of their Stories

Gail | Purple Hues and Me

Terri | Terri Steffes

Ann| The Apple Street Cottage

T’onna | Sew Crafty Crochet

Julie | Treasures Made From Yarn

Lydia | Life Beyond the Kitchen

Allyson | Southern Sunflowers

Mel | Decor Craft Design

Donna | Modern on Monticello

Linda | Crafts a la mode

Niki | Life as a LEO Wife

Floral Bag Upcycle with Upholstery Fabric

Upcycled Newspaper Flowers Wreath

DIY Painted Upcycled Mug

Bike Wheel Wreath

Wine Box Flower Arrangement

Denim Flowers Two Ways

Crochet Flower Facial Scrubbies

Watercolor Floral Bookmarks

DIY Door Hanger Craft Idea

Crochet Flowers

For more of my futureSpring posts, please follow me! And if you wanted to add my creations to your Pinterest boards, please follow me on Pinterest! Also find me on Instagram and Twitter!

For creative fellow bloggers, don’t forget to join You’re The Star” Blog Hop, Happiness Is Homemade Link Party and Home Matters Linky! Link your inspiring posts (anything, from recipes, home decor, DIYs, crafts, family, health to gardening) every Monday and Sunday. Get a change to be featured! I’m one of the co-host of You’re The Star blog hop for Creative Week and Happiness Is Homemade; I will choose the creative posts to be featured on Creative Features week and on Happiness Is Homemade. Please come and join the blog hop and I would love to see you there! Please join and share the news!

Spring Painted Mug Vase

Spring is coming, how wonderful! Flowers will bloom, garden will be colorful and anything flowers will be a main inspiration for spring season decor. Recently, I just retired some of my used mugs. That’s why I did some upcycling mug projects before, now, and maybe more later. I have some mug stock waited to be born again. Well, this time I made a spring painted mug vase. for

For spring look, I chose flowers as the theme for my painted mug project. The ear mug is blue, so I though I need to paint some blue flowers to match it. And one of my most favorite blue flower is hydrangea. I just love to see hydrangeas, in all colors. They are just beautiful and elegant. And they can last quite long in a vase too. It’s actually super easy to paint hydrangea, let me share with you how I paint spring hydrangea on a mug.

Things To Prepare

It is totally painting work, so there aren’t many things to prepare. I used an old mug which already have scratches inside. And it was just a gift mug from some milk I bought. It has some wordings on the mug, but not in large area. So, it’s easier to cover it by small paintings. Anyway, here is a short list of supplies you need to have to paint a spring mug vase :

  • An old mug
  • Blue and white acrylic paint (you can also use enamel paint)
  • Green and white acrylic paint
  • Paint brush

How To Make

When I paint something, I usually forget to capture each steps. That’s because I drown in the painting moment until I forgot to take picture. So, you may find some picture steps are to advance, but I hope you still understand through my description below. Okay, let me explain on how I painted hydrangeas on my spring mug vase :

1 .Mix blue paint with white paint to get several blue shades. Then leave some white paint to be used as it is.

2 .I start it off by painting the wording area. My mug has 2 wording areas, so I have to paint two hydrangeas. I covered the wording by painting it with the darkest blue mixture. Paint it with small and short strokes, like patching up on something.

3 .Use lighter blue mixture paint and paint some petals randomly. Then add some darker blue to the inner petals. Lastly, get the white paint and put a tiny dot on the middle of the flower.

4 .And to paint the leaves, use the lightest green mixture of dark green and white. Paint a shape of hydrangea leaves on both sides. Paint a darker green on the inner side that close to the flower. Finish it off with white paint by painting the leaf skeleton. Let it sits for a while to get a perfect dried painting

If your mug is totally white, it would be easier, you can paint whatever color hydrangea that you like. And if your mug ear has pink color, you can paint pink hydrangeas. Just match it with whatever color mug that you have. Some mug has inner color which you can match with the color hydrangea that you’re going to paint.

And at last, I added plastic hydrangea, since I don’t have cut hydrangeas right now. And it’s still look pretty after all. Actually this spring painted mug vase is a multifunctional mug, you can use it as any other holders that meets your need.

For more of my future Spring posts, please follow me! And if you wanted to add my creations to your Pinterest boards, please follow me on Pinterest! Also find me on Instagram and Twitter!

For creative fellow bloggers, don’t forget to join You’re The Star” Blog Hop and Happiness Is Homemade Link Party! Link your inspiring posts (anything, from recipes, home decor, DIYs, crafts, family, health to gardening) every Monday and Sunday. Get a change to be featured! I’m one of the co-host of You’re The Star blog hop for Creative Week and Happiness Is Homemade will choose the creative posts to be featured on Creative Features week and on Happiness Is Homemade. Please come and join the blog hop and I would love to see you there! Join and share the news!

See you!

Spring creativity!

Mel

Easy Hand Painted Christmas Truck

Finally I’ve painted a red Christmas truck that I have been wanting to paint for so long. I just love to see old vintage red truck. I drew a VW red truck by using color pencils before but this time I did not choose a particular brand of car. I just painted a red truck carrying a Christmas tree on a piece of white plank to serve as a Christmas sign.

I painted this Christmas truck with pine tree on a piece of pvc plank that I have in my storage. It’s white so it’s a great blank canvas to start with anything. I added a word JOY to give more Christmas spirit to my Christmas Truck Sign. I like the traditional Red and Green colors of Christmas that pop on this Christmas sign. It’s actually a very simple painting of a red truck followed by pine tree. Let me show you my short steps of painting this red truck sign.

Things To Prepare

Not much things to prepare as it is a painting project, the colors are also a few. I did not use too many colors as I only want a red and green colors to be dominant on this Christmas truck hand painting sign. Anyway, here are the list of things that I prepared for the Red Truck Painting:

  • A white plank ( I used PVC plank, you can use white painted wooden plank, it’s up to you)
  • Red acrylic paint
  • Black Acrylic paint
  • White acrylic paint
  • Green acrylic paint
  • Black marker

How To Make

It took me about 15 minutes to pain this red truck with the Christmas tree. Most of the time spent was to wait for the paint to dry. But it’s acrylic, so it’s quicker to dry. But if you need more time to dry, you can mix acrylic with watercolor a bit. Now. let me explain step by step, my easy process of painting this Christmas truck:

1. Make sure the surface of the media that you want to paint on is clean.

2. I started with the body of the truck and I use red acrylic paint. Let it dry

3. Then I continue with painting a pine tree on the truck bed. I use green color paint and I mixit with a dash of white to get a lighter green to give some gradation. I paint the pine tree with lighter green, then give some darker shades and white shades to give some depth to the tree. Wait until it’s dry.

4. Okay, now it’s time to give some shades to the truck to have the feeling of three dimensional. And of course the two wheels. I used black and white. And I also paint a little dash of light green mixed with more white on the truck windows.

5. While waiting for the truck painting to dry. You can write the word JOY by using a black marker next to the Christmas truck. Finished!

Not that difficult isn’t it? Once you try it, it’s not as complicated as it looks. Just do it slowly and pay attention to the details. It doesn’t have to a fine painting. It’s just a rough quick painting of red truck with Christmas tree that I made for this Christmas sign. Well, good look with your painting and have fun!

For more of my future Winter and Christmas posts, please follow me! And if you wanted to add my creations to your Pinterest boards, please follow me on Pinterest! Also find me on Instagram and Twitter!

For creative fellow bloggers, don’t forget to join “You’re The Star” Blog Hop and Happiness Is Homemade Link Party! Link your inspiring posts (anything, from recipes, home decor, DIYs, crafts, family, health to gardening) every Monday and Sunday. Get a change to be featured! I’m one of the co-host of You’re The Star blog hop for Creative Week and Happiness Is Homemade will choose the creative posts to be featured on Creative Features week and on Happiness Is Homemade. Please come and join the blog hop and I would love to see you there! Join and share the news!

See you!

Merry creative Christmas!

Mel

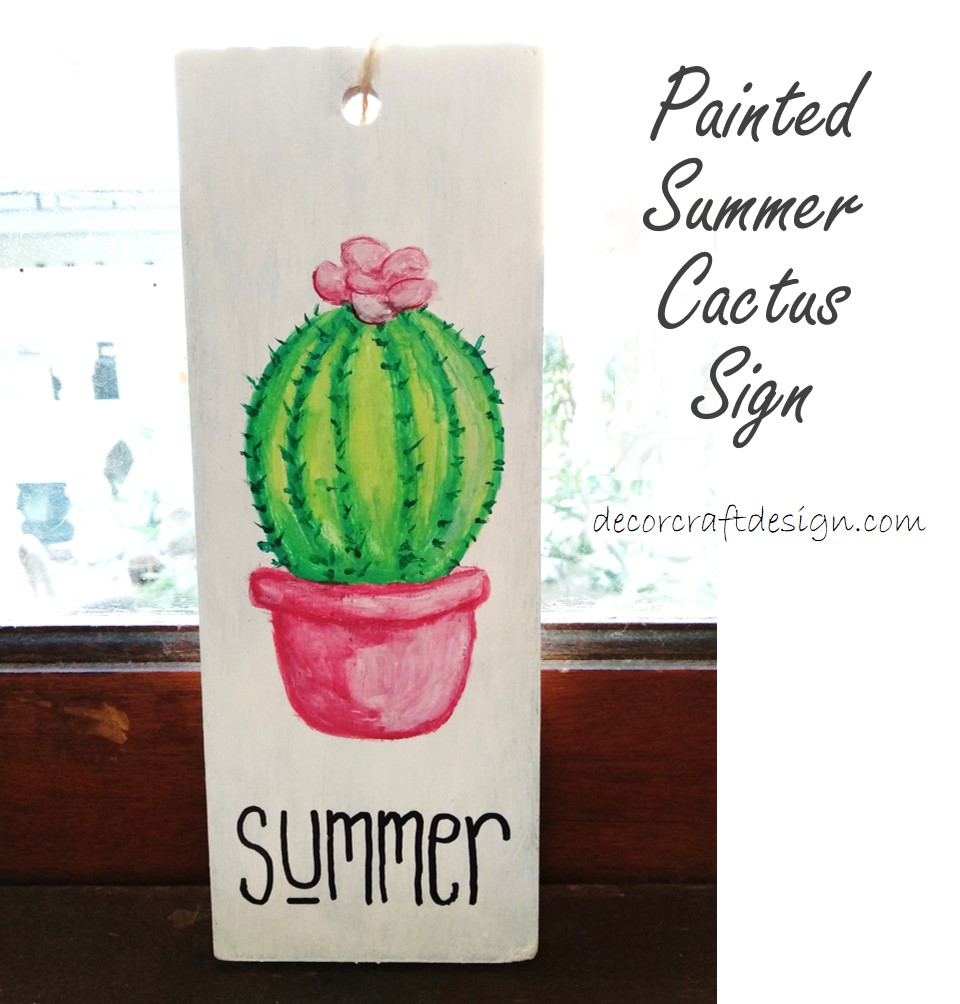
Painted Summer Cactus Sign

I painted a summer cactus sign this time. I used the other side of my DIY Spring Sign , which makes it into a double sided sign, one side is for spring, and the other side is for summer sign. So you can hang the sign along two seasons of spring and summer, just need to flip it when the season is changed. Very practical sign isn’t it?

Why cactus is always relate to summer? I guess because it’s a tropical plant which able to survive in heat and less water environment. And cacti have a great ability to store water and protect it from evaporate through the succulent stem which has a smooth surface. A cactus can be build up by 90% water, incredible right? That’s why a cactus is a perfect plant for summer; low maintenance but cute and pretty as decoration. If you don’t have a cactus yet, you can paint it like I did, a painted summer cactus sign; and hang it in your home.

Picture91

Things To Prepare

This is absolutely painting work. I used my previous spring sign and use it as a double-sided sign. And the spring sign itself was an upcycling defected sign I bought from Daiso for half price. I don’t have to have more decoration at my storage by having a double sided sign. Anyway, these are the things that I used to make this painted summer cactus sign:

  • Wooden plank ( I used my previous spring sign)
  • Jute rope (It was there before as a rope hanger when I bought the sign)
  • White, light green, dark green, yellow, red acrylic paint
  • Black permanent marker

Picture88

How To Make

Since I already painted both side of the upcycled wood plank when I made my spring sign, my work was easier. That was why I can started painting on the other side which was already in white painted. I did it in a rough paint though, I like it in a bit rusty look.

  1. I started by painting the cactus pot in pink acrylic which was mixed from white and red paint. I chose the pot as the starter because it’s the middle object of the painting, it would be easier as the perimeter of the proportion. On top side, it would be the cactus and below would be the word “summer”.
  2. Decide where the light would be from, left or right, then you can paint some darker shade to the pot.
  3. Paint the cactus with light green first, followed by yellow mixed with a bit of white paint. Paint the yellow and form some parts.
  4. Enhance the parts by paint a blurry line with darker green. After that add some thorns along the lines with dark green paint. Leave it dry.
  5. Mix the pink paint from previous with white, get lighter pink to paint the flower o  top of the cactus. Give some shade of white and dark pink to have a 3D look.
  6. Write the word ‘SUMMER” by using black marker. Let it dry.

Picture92

I haven’t have a proper facility to perform a video to show the steps of my painting, but that is on my wish list, so who knows? 😊 I hope my tutorial would be handy to guide you to paint a similar cactus of your favorite. By the way, this little cute summer cactus sign would be a great addition to a summer decor. So, what are you waiting for? Get your brush and do little painting fun!

Picture89

For more of my future Summer posts, please follow me! And if you wanted to add my creations to your Pinterest boards, please follow me on Pinterest! Also find me on Instagram and Twitter!

Pinterest-iconImage result for instagram buttonRelated image

Picture93

For creative fellow bloggers, don’t forget to join “You’re The Star” Blog Hop ! Link your inspiring posts (anything, from recipes, home decor, DIYs, crafts, family, health to gardening) every Monday and get a change to be featured! I’m one of the co-host of the blog hop for Creative Week and will choose the creative posts to be featured on Creative Features week. Please come and join the blog hop and I would love to see you there! Join and share the news!

Picture90

See you!

Stay at Home and Stay Creative!

Mel

Bonsai

I made a doodle of Bonsai tree, a fruit bonsai of oranges. It’s amazing to see such a big tree can come in a very small size, truly an art. The process of growing the bonsai tree is even more fascinating. A lot of techniques, experiences, efforts and of course an abundant of patience; to have a plant turn into a gorgeous bonsai tree. I chose an orange bonsai tree because I love to see some mini oranges hanging on the small bonsai tree; it’s just so cute with a pop orange color.

About Bonsai

We mostly know one of famous plant from Japan is bonsai. Bonsai in Japanese means “tray planting”. You may think the bonsai must be invented by Japanese, but it’s truly not. The bonsai is originally came from China. In Chinese a bonsai is called penzai or penjing. I read that once, some Japanese monks were visiting Chinese monks and the Japanese learnt the bonsai techniques from the Chinese monks. When the Japanese monks returned to Japan, they go deep into the bonsai techniques and made it famous. The bonsai art is also common in East Asia.

Picture86

Bonsai is not meant for production such as of fruits or medicine. In the other hand, bonsai practice focuses on long-term cultivation and shaping of one or more mini trees growing in a small beautiful container. It is more to an art. The main purposes of bonsai are primarily contemplation for the viewer, and more to the pleasant exercise of effort and ingenuity for the grower. It’s an amazing triumph for the bonsai grower to successfully created a new form of a bonsai tree. And it would be a pleasure for the bonsai lover to enjoy viewing the bonsai art.

Anyway, after a short story of bonsai, I am going to use my bonsai drawing as my header for summer. Bonsai can grow along the year but I just love a fresh look of the fruit bonsai. And you just need some freshness of fruits on summer, it’s cooling. I also added some summer colors to the background of the header. I hope you enjoy my new header.


summer20header

For more of my future Summer posts, please follow me! And if you wanted to add my creations to your Pinterest boards, please follow me on Pinterest! Also find me on Instagram and Twitter!

Pinterest-iconImage result for instagram buttonRelated image

For creative fellow bloggers, don’t forget to join “You’re The Star” Blog Hop ! Link your inspiring posts (anything, from recipes, home decor, DIYs, crafts, family, health to gardening) every Monday and get a change to be featured! I’m one of the co-host of the blog hop for Creative Week and will choose the creative posts to be featured on Creative Features week. Please come and join the blog hop and I would love to see you there! Join and share the news!

See you!

Stay at Home and Stay Creative!

Mel

Happy Earth Day

Happy Earth Day!

The earth is breathing right now, after all this time.

A little earth sketch from me with colored pencils as appreciation to earth.

Let’s celebrate Earth Day and love our earth !

Picture133

For more of my future Mother’s Day and Spring posts, please follow me! And if you wanted to add my creations to your Pinterest boards, please follow me on Pinterest! Also find me on Instagram and Twitter!

Pinterest-iconImage result for instagram buttonRelated image

For creative fellow bloggers, don’t forget to join “You’re The Star” Blog Hop ! Link your inspiring posts every Monday and get a change to be featured! I’m one of the co-host of the blog hop for Creative Week and will choose the creative posts to be featured on Creative Features week. Please come and join the blog hop and I would love to see you there! Join and share the news!
 

See you!

Love our earth and stay creative!

Mel

Happy New Year 2020

Dear My Lovely Readers,

Happy New Year 2020! May all best wishes come true in this new year of hope and new beginnings! Thanks for all the love, likes, visits, and beautiful comments! Good bye to year of 2019; great experiences, memories and lessons to be treasured in new year of 2020.

Picture110

I drew this Happy New Year greetings on my old desk calendar. Do you remember that I’ve made a wire Christmas tree from old desk calendar? Yes, that was it, I drew it on the other side of it. I drew some pretty snowflakes and a happy new year calligraphy by using a silver acrylic marker from Miniso. It’s a great contrast between silver and dark blue. I also added some twinkles around the wording by using Miniso acrylic painter in gold.

I hope you enjoy my New Year greetings as much as you will be enjoying New Year’s Eve celebration of welcoming the year of 2020. Once again, Happy New Year to you all! Much love to you and thank you very much!

Picture108

Don’t forget to check out my recent New Year’s posts for easy DIY new year’s inspirations:

For more of my future New Year posts, please follow me! And if you wanted to add my creations to your Pinterest boards, please follow me on Pinterest! Also find me on Instagram and Twitter!

Pinterest-iconImage result for instagram buttonRelated image

Picture109

And for creative fellow bloggers, don’t forget to join “You’re The Star” Blog Hop ! Link your inspiring posts every Monday and get a change to be featured! Starting June 2019, I will be co-hosting the blog hop and would love to see you there! Join and share the news!

See you next year!

Happy Creative New Year!

Mel

Christmas Tree in Colored Pencils – Merry Christmas

Joy to everyone! It’s Christmas! Gather around the Christmas tree with family and opening Christmas gifts. Wonderful day to be treasured. And maybe this year you can share a little story behind Christmas tree, especially to your little ones. Let me share a glance of what I have read about history of Christmas tree. And I also drew a little Christmas tree in colored pencils to wish you Merry Christmas!

Picture97

Christmas Tree History

Germany is the one who came out with the idea of having Christmas tree tradition in the 16th century. Afterwards, Christmas trees was brought first on 18th Century to America by the German settlers of Pennsylvania. But at that time, it was not commonly accepted by Americans. However, by the 1890s Christmas ornaments were imported from Germany and Christmas tree popularity was on the trend among Americans. The trend was influenced by the fashionable Queen Victoria who was illustrated standing by a Christmas tree with her family in 1846.

In early 20th century, Americans used homemade ornaments to decorate their trees, while the German-American were using apples, nuts, and marzipan cookies. When the electricity brought as Christmas lights which enable Christmas trees to glow. From there, Christmas trees began to appear in town squares all over the country. From then on, having a Christmas tree in the home became an American tradition. Nowadays, people use many kind of ornaments, from Christmas balls to candy canes.

Picture96

Best wishes to you all in this Christmas day and once again, Merry Christmas!

For more of my future New Year posts, please follow me! And if you wanted to add my creations to your Pinterest boards, please follow me on Pinterest! Also find me on Instagram and Twitter!

Pinterest-iconImage result for instagram buttonRelated image

And for creative fellow bloggers, don’t forget to join “You’re The Star” Blog Hop ! Link your inspiring posts every Monday and get a change to be featured! Starting June 2019, I will be co-hosting the blog hop and would love to see you there! Join and share the news!

See you!

Be Merry and Creative!

Mel

Christmas Ball In Colored Pencils

Decorating a Christmas tree must be the most exciting things to do with the entire family during Christmas holiday. Bring out family collections of Christmas tree decorations and puting those glistening and pretty Christmas ornaments to the tree is the best part. Some collections of Christmas ornaments must be the family favorite and some even passed down from generation to generation. There are candy canes, stars, angels, holy berries, Christmas balls and many more to be hung on Christmas tree. I love Christmas balls, the glass balls with pretty and sparkling decorations makes it fun to look at. For that, I tried to captured the beauty of Christmas balls in colored pencils.

Picture87

Origin And History

Brought by German and English immigrants at 1800s, Christmas ornaments including Christmas balls are well accepted in America. Many names have been called after a Christmas ball, some call it baubles, Christmas bulbs, Christmas bubbles or Christmas “ball balls”. They usually used as festoon around the Christmas tree to be hung individually. Balls ornaments commonly made of blown glass, metal, wood, expanded polystyrene, ceramics or even  blown plastics.  The Christmas balls are very attractive to be seen and used as Christmas tree decorations; since they come in many forms, from a simple round ball to impressive artistic designs.

Go back to 16th century, the first idea of decorating a tree for Christmas was originated in Germany, which were using fruits and nuts to bare trees as a symbol to a promise of spring to come. Germans also decorated evergreen trees with apples, which were reflecting a paradise trees, that nevertheless represented the forbidden fruit tree. They also used white candy canes and pastries in the form of hearts, stars and flowers.

Picture88

From then on, people began to put glass ornaments on their Christmas trees. The first glass ornaments were created by Hans Greiner (1550–1609), who made garlands of glass beads and tin figures that could be hung on trees in Lauscha, Germany. Legend has it that he couldn’t afford apples to decorate his tree, so he decided to make his own in the shape of glass apple. Other people liked what they saw and began to order their own glass fruit. Most of these glass ornaments were made in Germany until after World War II. And one of the most stand out and favorable glass ornaments is Christmas balls.

So, how about your Christmas balls collection, any particular favorite or story behind it? Please share with me on the comment! And please enjoy my Christmas ball in colored pencils, hope it’s inspired you more on Christmas tree decor! Happy Holiday!

Picture86

For more of my future Christmas and New Year posts, please follow me! And if you wanted to add my creations to your Pinterest boards, please follow me on Pinterest! Also find me on Instagram and Twitter!

Pinterest-iconImage result for instagram buttonRelated image

And for creative fellow bloggers, don’t forget to join “You’re The Star” Blog Hop ! Link your inspiring posts every Monday and get a change to be featured! Starting June 2019, I will be co-hosting the blog hop and would love to see you there! Join and share the news!

See you!

Happy creative holiday!

Mel

Christmas Candy Cane In Colored Pencils

Today I drew a Christmas candy cane in colored pencils. I was only using 2 colored pencils of red and white. A traditional red and white candy cane. It seems imperfect without some candy canes on Christmas decor. It can be used to dress up your Christmas tree, as Christmas souvenirs or simply as refreshments for kids and adults.

Picture63

History Of Candy Cane

To those whose unfamiliar with candy cane, a glance of history on candy cane would be a great reading. A candy cane is a cane-shaped stick which traditionally white with red stripes and has a flavor of peppermint. Candy cane also come in a variety of other flavors and colors. Candy candy often associated with Christmas and it has a story behind it.

Legend has it that in 1670, the cane shaped candy became historical when a choirmaster at the Cologne Cathedral in Germany who bent the candy sticks into canes to appear as shepherd’s hooks. The all-white candy canes were given out to the children which now commonly presented in white with red stripes.

Picture62

Well, have you prepare your candy canes for coming Christmas? The real candy canes or candy canes ornaments to sweeten your Christmas celebration. Kids  or adults would favor the sweet look and taste of candy cane. Have a sweet day!

For more of my future Christmas posts, please follow me! And if you wanted to add my creations to your Pinterest boards, please follow me on Pinterest! Also find me on Instagram and Twitter!

Pinterest-iconImage result for instagram buttonRelated image

And for creative fellow bloggers, don’t forget to join “You’re The Star” Blog Hop ! Link your inspiring posts every Monday and get a change to be featured! Starting June 2019, I will be co-hosting the blog hop and would love to see you there! Join and share the news!

See you!

Happy sweet creative day!

Mel

Christmas-Berry in Colored Pencils

I drew this yesterday, some Christmas leaves and berries. I only use colored pencils of 3 different greens and a red color. It’s a quick sketch that I’m sure I can use it soon for any of my Christmas project. I’m thinking of a printable that will help with Christmas preparations. Well, we’ll see about that on my next post.

This Christmas-berry is also known as Holy which is commonly used as Christmas decorations in many forms; Christmas cards, Christmas tree, Christmas wreaths and many more. The Christmas Holy is an evergreen shrub with glossy green leaves and deeply colored, small red berries. The plant Of the Christmas-berry is occasionally referred to as the California holly, but the difference is that the leaves of the Christmas berry are round, not sharp.

Usually, Christmas berries ripen at the end of the fall  around this time and remain through the winter months. So, it’s great decorative plant for winter. Not just the Christmas berry’s plant would look wonderful on your front terrace during Christmas and along winter, but you can also use the berries and the leaves for your Christmas decors and DIYs.

Picture59

You may get inspired to make a Christmas crafts, DIYs, painting or maybe a recipe by looking at this colored pencils Christmas-berry of mine. Tell me of your ideas that just pop up?!

For more of my future Christmas posts, please follow me! And if you wanted to add my creations to your Pinterest boards, please follow me on Pinterest! Also find me on Instagram and Twitter!

Pinterest-iconImage result for instagram buttonRelated image

And for creative fellow bloggers, don’t forget to join “You’re The Star” Blog Hop ! Link your inspiring posts every Monday and get a change to be featured! Starting June 2019, I will be co-hosting the blog hop and would love to see you there! Join and share the news!

See you!

Happy creative day!

Mel

Happy Halloween

Happy Halloween to you all!

I hand sketched two Halloween pumpkins by using pencil colors only. Hope you enjoy your Halloween night as much as you enjoy my Halloween pumpkin colored sketch!

Happy trick or treats!

Picture34

For more of my future Fall and Welcoming Halloween and Thanksgiving posts, please follow me! And if you wanted to add my creations to your Pinterest boards, please follow me on Pinterest! Also find me on Instagram and Twitter!

Pinterest-iconImage result for instagram buttonRelated image

 And for creative fellow bloggers, don’t forget to join “You’re The Star” Blog Hop ! Link your inspiring posts every Monday and get a change to be featured! Starting June 2019, I will be co-hosting the blog hop and would love to see you there! Join and share the news!

See you!

Stay Creative!

Mel

Halloween Framed Hand Painting

I love to draw, to paint and this coming Halloween was my inspiration to move my hand on a sketch book. On my previous post, I have shared a Free Halloween Coloring Printable For Kids and you are still free to download the template on that post. I drew and painted it to be framed as Halloween decoration. This Halloween framed hand painting; a coloring version of mine may give your kids the color inspiration to do the Halloween Coloring.

I hand painted the Halloween drawing of scary Halloween pumpkins, bats, a witch riding on a broom of the full moon. I painted it with watercolor. It’s a Halloween night that I wanted to show, so it’s a dark vibes I gave.

Picture24

Things To Prepared

I used white frame to contrast the dark shades I used for painting the Halloween drawing. Shades of watercolors I used were:

  • White
  • Vermilion
  • Crimson
  • Prussian Blue
  • Violet
  • Burnt Sienna
  • Lemon Yellow
  • Black
  • Green Sap
  • Green Deep

I framed the Halloween painting with white frame and black color paper card as the background.

Picture21

A Halloween painting to be framed and used as decoration is one of the quick solution to have your home a Halloween decor. And you can have fun with choosing the colors that you prefer for your Halloween themed home decor. Note: I joined Try It On Tuesday for this Halloween painting.

Picture23

For more of my future Fall and Welcoming Halloween posts, please follow me! And if you wanted to add my creations to your Pinterest boards, please follow me on Pinterest! Also find me on Instagram and Twitter!

Pinterest-iconImage result for instagram buttonRelated image

And for creative fellow bloggers, don’t forget to join “You’re The Star” Blog Hop ! Link your inspiring posts every Monday and get a change to be featured! Starting June 2019, I will be co-hosting the blog hop and would love to see you there! Join and share the news!

Picture22

See you!

Stay creative!

Fall Leaf In Watercolor Shades – Quote Painting

It’s September and Fall is on it’s way. Leaves are falling and new beginning is calling. To welcoming Fall season, I’ve painted a maple leaf in watercolor fall shades. When I think of fall, I think of maple leaf. Maple leaf is so pretty with its distinguish shape and its changing colors.

I painted the maple leaf in fall colors. I also added a quote “Fall; leaves are falling and new beginning is calling”. It’s a great fall quote painting for your inspiration. Many creations can be creatively created from this piece of fall leaf quote painting.

Picture61

I started with a thin pencil sketch of a maple leaf. I prepared six colors that representing fall. The six colors are; in painted order :

  1. Burnt Sienna watercolor
  2. Crimson watercolor
  3. Vermilion watercolor
  4. Yellow Ochre watercolor
  5. Lemon Yelow watercolor
  6. Gold poster color

Picture63

I used gold poster color because I don’t have gold watercolor. So, it’s not a certain thing to follow. I love gold leaf look which makes Fall perform in more glamorous way. Like I have mentioned before, this fall leaf quote painting in watercolor shades can be an inspiration to create other creative form to welcome Fall season.

For more of my future Welcoming Fall season posts, please follow me! And if you wanted to add my creations to your Pinterest boards, please follow me on Pinterest! Also find me on Instagram and Twitter!

Pinterest-iconImage result for instagram buttonRelated image

Picture62

And for creative fellow bloggers, don’t forget to join “You’re The Star” Blog Hop ! Link your inspiring posts every Monday and get a change to be featured! Starting June 2019, I will be co-hosting the blog hop and would love to see you there! Join and share the news!

See you!

Fall for creativity!

Mel