
This is not a usual treat of ice cream sticks. Why? Because I made those ice cream sticks into a wooden plate. From there, I have some great ideas for functional decorations to make. I love functional decorations instead of just plain decoration. More meaning! More functional items in our home is better, something pretty yet useful. So, first thing first. On this occasion, I will show you how to make diy painted coaster from ice cream sticks.
What do you need to make a painted coaster out of ice cream sticks?
- Ice cream sticks
- Glue (for wood)
- Spray paint – white color
- Acrylic paint – red, white, black color
- Paint brush
- Organic rope
- UHU glue
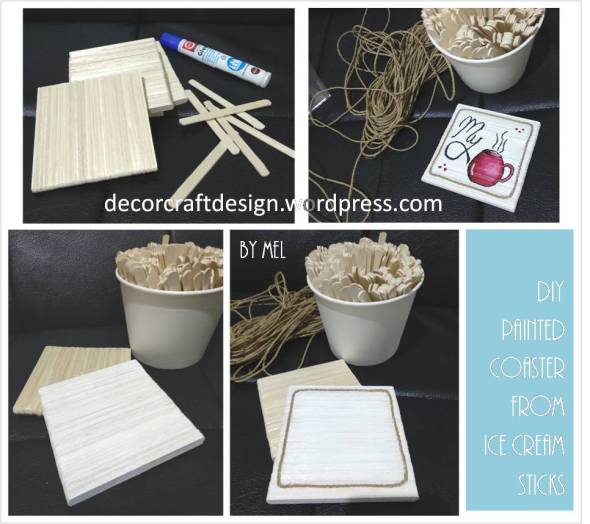
How to diy a painted coaster from ice cream sticks?
- Apply glue (for wood) evenly along the ice cream stick surface. Glue the ice cream sticks to each other one by one. Watch for the same length and width.
- Line them all up until it is square in dimension.
- Let it sit for a while until the glue dry and become a firm wooden panel.
- Spray or apply paint to all the surfaces of the ice cream sticks panel with white color. Let it dry.
- Take organic rope and arrange it gently but firmly around the coaster surface by creating an inner frame. Glue it with UHU. Let it dry.
- Paint the inner coaster with white acrylic paint to have more contrast. Let it dry.
- Paint the wording and the mug with black paint. Let it dry.
- Color the mug with red gradations and the help of white acrylic paint to get a 3D look on the mug. Let it dry.
- Fill out some blank space on above and below corners with 3 red dots each. let it dry.
- Your diy painted coaster from ice cream sticks is ready.

You can be creative with the painting for the ice cream sticks coaster, the object, the colors or the wording. I chose the red color for great contrast. You can choose any theme according to your home color theme or party theme or simply your favorite color / object.
The ice sticks became a solid wood and made into a strong and thick drink coaster. It can also used for bowl of hot soup coaster. It’s easy, cheap and fun to do. So, happy trying!
![]()

I entered my diy painted coaster from ice cream sticks to following challenges:
- Mix It Up – Anything goes + mixed media
- Love To Craft – July anything goes
- My time To Craft – Sketchy time
- Dream Valley Challenges – All things bright and beautiful
- 613 Avenue Create – Anything goes
- Crafting With An Attitude – Always anything goes
- Sparkles Monthly Challenges – Let’s be pretty
- We Love To Create – Anything creative mixed media goes
Please follow me to find more future posts about using ice cream sticks for functional home decorations and more other creative handmade.
Ice Stick to creativity!
See you very soon!
Mel

Wow, what an amazing make! This is such a great idea and I love how you can personalise them to fit your decor, mood etc. The texture from the ice-cream sticks looks wonderful too 😁. Wishing you a happy new week! J 😊 x
LikeLiked by 1 person
Thank you so much Jo! Yes, I love the texture too, it gives character. Happy Monday!
LikeLiked by 1 person
Super cute!!! Thank you for joining us at Love to Craft, good luck!!! Amy DT
LikeLiked by 1 person
Thank you so much Amy!
LikeLike
very creative and fun way to make coasters. thanks for joining in at MIUCB challenge. good luck
stamping sue
http://stampingsueinconnecticut.blogspot.com/
LikeLiked by 1 person
Thank you Sue! It’s a great pleasure, thanks for stopping by
LikeLike
Oh this project is so much fun! I love the bright red mug on it.
Thank you for joining the Crafting With An Attitude challenge.
Monica C. DT CWAA
LikeLiked by 1 person
Thank you Monica! It’s a great pleasure to join in. Thanks for stopping by
LikeLike
a very clever idea!
thank you so much for playing along with us at sparkles monthly!
hugs and kisses from germany,
Silvi xoxo
LikeLiked by 1 person
Thank you Silvi! It’s great to join in your wonderful site. Thanks for stopping by, hugs!
LikeLike
These are great. I love seeing this, it is so important to keep things out of the dump as much as possible. I have so much fun recycling. You have some unique ideas too and I love that added touch of your drawing.
LikeLike
This is super cute! Happy PPF from Number 23 😀
LikeLike
Great tutorial. Thanks so much. Been looking for some new coasters.
LikeLiked by 1 person
Thank you so much Nicole! Happy to help, thanks for stopping by, have a good day!
LikeLike
Excellent Idea, turned out so different than I thought it would. Blessings, Janet
LikeLiked by 1 person
Thank you so much Janet! Have a great Monday!
LikeLike
This is a great project. I love the way it gives depth to the cup too. Thank you for joining the Dream Valley challenge.
LikeLiked by 1 person
Thank you so much! Happy to join in, have a lovely day
LikeLiked by 1 person