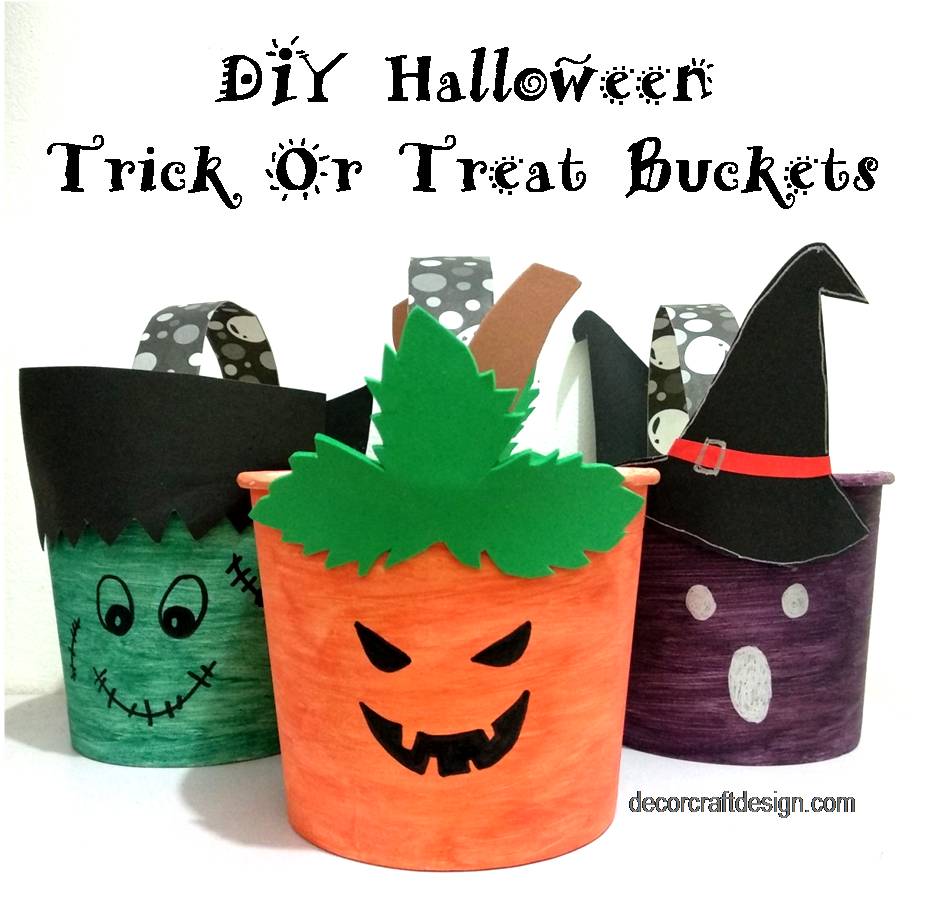
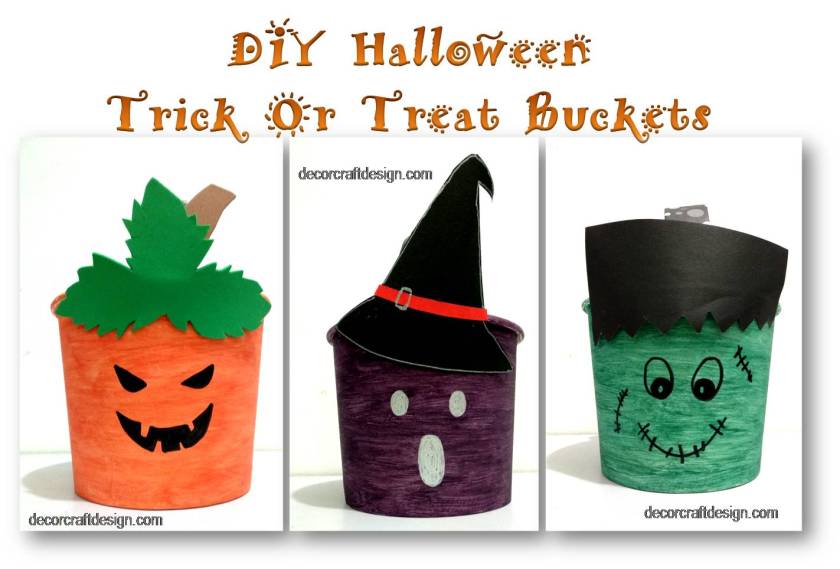
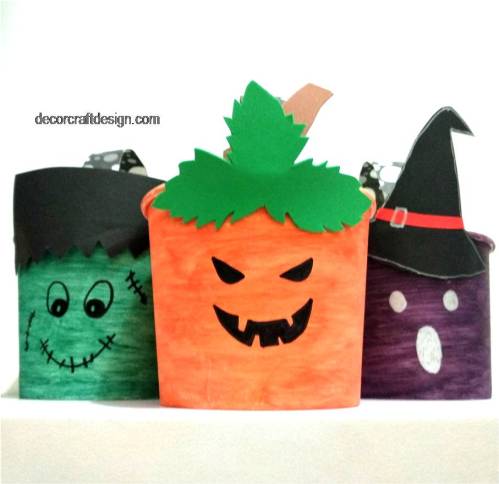
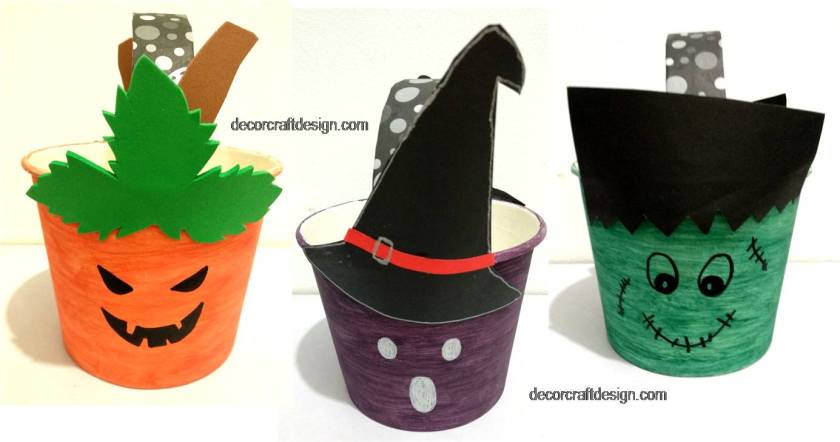
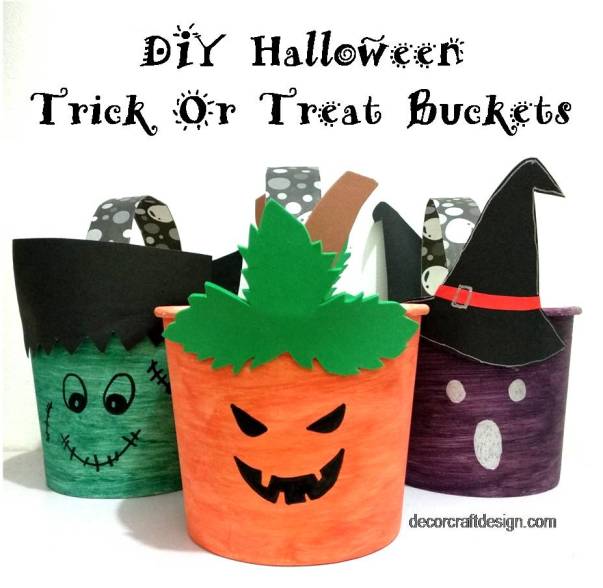
Halloween must be one of the most exciting celebration for kids; who wouldn’t want to wear cool costume and get lots of candies on Halloween trick or treat?! Well, mommies, I have some cheap DIY Halloween but cool looking ideas to give your kids a bigger smile to go on trick or treat. I made a Halloween trick or treat buckets with 3 different looks, a scary pumpkin, a witch ghost and a cute Frankenstein. Just choose your favorite!
Things To Prepare
It’s a cheap Halloween DIY because I upcycled a paper bowl and use any scrap I have that match the colors I need. So here is the list of things I used to make this trick or treat buckets :
- Paper bowls ( I got it from food delivery)
- Craft foam (green and brown)
- Black card
- kraft card
- paper wrap in black and white
- Orange pumpkin, green, and purple (from red and blue, plus white) watercolor
- Black marker
- Silver marker
- Glue

How To Make
Easy diy to make for your Halloween trick or treat candy hunting. So let me share you how the steps are:
- Paint paper bowl used as a bucket, each with different color of orange pumpkin, green and purple. Let it dry.
- Cut the kraft card around 1 inch for the handle, then wrap it with black and white paper wrap.
- Attach the handle to each bucket by using stapler.
- Cut black card in the shape of Frankenstein’s hair, make two sets. Then glue each to the side of the handle. Draw eyes, stitched lips and couple of stitches with black marker on two sides of the bucket, right under the hair. Your Frankenstein trick or treat bucket is ready!
- Cut two witch’s hat from black card with glued orange paper as a belt. Draw a line around the hat and buckle with silver marker. Attach the hat each to the handle. Draw rounded eyes and rounded mouth with silver marker on both side of the bucket, right under the hat. Your ghost trick or treat bucket is ready!
- Cut two leaves and two stem from orange and brown craft foam. Glue the stem first and then the leaves to each handle. Draw Halloween pumpkin eyes and smile with black marker on both side of the bucket, right under the leaves. Your Halloween pumpkin trick or treat bucket is ready!
Easy and you can be creative with scraps you have for decorating the trick or treat buckets. It’s a great upcycle paper bowls project for cheap Halloween DIY. Your kids would have a good time making it or happily surprised to get them from you to cheer more of their Halloween trick or treat fun time.
For more of my future Fall and Welcoming Halloween posts, please follow me! And if you wanted to add my creations to your Pinterest boards, please follow me on Pinterest! Also find me on Instagram and Twitter!
![]()

![]()
And for creative fellow bloggers, don’t forget to join “You’re The Star” Blog Hop ! Link your inspiring posts every Monday and get a change to be featured! Starting June 2019, I will be co-hosting the blog hop and would love to see you there! Join and share the news!
See you!
Trick your creativity to be a treat!
Mel

These are so cute. My favorite is Frankenstein.
LikeLiked by 2 people
Wow, this Mr, Green is a hit! 😀 Thank you so much!
LikeLike
These are so cute!! I love the Frankenstein one!
LikeLiked by 2 people
My son too! 😀 Thank you Michelle!
LikeLiked by 1 person
These look so easy. A great craft for the grandkids. Thank you!
LikeLiked by 2 people
Yes, I’m sure your grandkids would love these, they can choose their favorite monster 😀 Thank you, Diane!
LikeLiked by 1 person
thanks for share
LikeLiked by 1 person
Pleasure is mine! Thanks!
LikeLike
My kids would enjoy making these 🙂
LikeLiked by 2 people
Thank you, Denise!
LikeLike
Oh these buckets are such fun! I love the different Halloween designs – perfect 😁. Wishing you a wonderful week! Hugs, Jo x
LikeLiked by 1 person
Thank you so much, Jo! have a wonderful week to you too!
LikeLiked by 1 person
what fun and cute projects to do with kids – thanks for sharing, and happy PPF Mel!
LikeLiked by 1 person
Thank you so much Linda! Happy PPF and lovely Friday!
LikeLike
love this!
LikeLike
very clever Mel. Lots of inspiration there for some home-created goodies! Happy PPF :D)
LikeLike
These are so cute, Mel, and I love that the kids can help make them too. Your DIY trick or treat buckets are fun, frugal and so creative. Thank you so much for sharing this post with Hearth and Soul. I’ll be featuring it at the party Monday this week. I hope to ‘see’ you there! Have a wonderful week!
LikeLiked by 1 person
Thank you so much, April! My pleasure to share, especially the ones that would give a big smile to kids. Will definitely drop by your wonderful link party as always! Have a wonderful week to you too!
LikeLike
Loved doing art like this when I was teaching elementary school. – margy
LikeLiked by 1 person
Yes, my son was already took the green bucket 😀 Thank you, Margy!
LikeLike
Very cute and creative
LikeLiked by 1 person
Thank you so much, Anita!
LikeLike
What cute buckets Mel!!
Thank you for linking up at Create, Bake, Grow & Gather this week. I’m delighted to be featuring your DIY trick or treat buckets at tomorrow nights party and pinning too.
Hugs,
Kerryanne
LikeLiked by 1 person
Thank you so much, Kerryanne! I’m thrilled and can’t wait to visit you and link up my new posts like always! xo
LikeLike
Love these! I wish my boys were still young enough to go trick or treating! Thanks for linking up to Best of the Weekend. I featured your post this week. Swing by to see the other features and to link up for this week. I will also be pinning and sharing on Instagram stories this weekend. Thanks for joining us and have a wonderful weekend!
Shelley
LikeLiked by 1 person
Wow, thank you so much Shelley! I can’t wait to visit you and linking up at your wonderful blog hop! Happy weekend!
LikeLike
So cute. I’m not crafty, but I sure appreciate those that are.
Thank you for joining the Awww Mondays Blog Hop.
Have a fabulous Awww Monday and week. ♥
LikeLiked by 1 person
Thank you so much Sandee! It’s a very easy craft to try 🙂 xo
LikeLiked by 1 person